Wednesday 6 July 2016

La Passacaglia Update: July 2016

So much for #2015projectoftheyear. This is a large, slow project, but so very enjoyable. Sometimes it gets set aside for other things and that's okay. But when I am working on it, I enjoy every fabric selection, every fussy cut, and every stitch. This is my latest complete rosette:
Heather Ross plus bees Rosette
I've been dragging my feet with this one.  I attempted the single piece centre star, which worked out pretty well, but after adding the bees, I felt like this one just wasn't working.  Too light maybe? And I had no idea what to do for the diamonds in the next round.  I knew I wanted to use the strawberries, but just didn't know what to pair them with.  Then a brainstorm hit, and I pulled out the yellow beehive fabrics and the rosette blossomed from there.  At first, I thought I would end up changing out the centre bit with the frog and the green long diamonds, as I didn't think that the pinks and the greens worked with the outer ring.  But once I got it all put together, I loved it.  Sometimes I overthink things.

I think the small stars were really holding me up from hitting my stride with this pattern. I simply dreaded working on them. But I figured out two things that make them more efficient and therefore more tolerable. Previously, I would stitch each star point onto the pentagon individually, each with an individual thread. Now, I use one thread to sew the points on in a ring around the pentagon. Also, I only attach the bottom four when I am working on a large cog. The top point I attach to the double pentagons above so that there is more straight line stitching in that round, which is much more efficient!
Topless Stars......
There they are!
I have pieces prepped for the next round as well. 
My fussy cut game is on point!
I'll keep working away and will update as I go. It may be soon, it may be a ways off. That is the nature of this project! Follow along on Instagram with #ltslapassacaglia. And if you are working on your own, join the #LaPassPieceAlong!

To see more of this project, check out The Homemade Heart's La Passacaglia Quilt Index

Monday 4 July 2016

DIY Baby Carrier Teething Pads

I just got an Ergobaby carrier to do some baby wearing with Stanley, and the first thing he does once he is settled into it is start chewing and drooling all over the straps. This will not do. I can't tolerate crispy dried drool, but I also don't want to have to wash the whole dang thing after every few uses. I did a little googling, and sure enough, Ergobaby sells removable teething pads that you can snap over the straps. But seeing as my motto is "Homemade anything is better than store bought everything", and I have an abundance of fabric around here, I set to work making my own. And I took a few pictures along the way in case you want to make some, too!

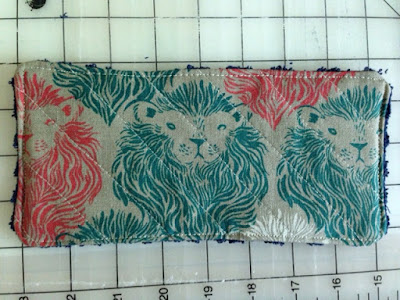
First gather your materials. I used a wash cloth, some scraps of quilt batting, and some canvas (Cotton and Steel lions), plus four snaps. 

I used my 9.5" quilting square to cut the washcloth, batting, and canvas into two sets of 9 inch x 4.75 inch pieces. I fussy cut the lions so that they would be centred on the strap, so depending on what kind of fabric pattern you select, you may want to be mindful of that.
I adore these lions
Next, I layered the canvas and the quilt batting and did some simple straight line quilting on the diagonal. 

Then I layered the washcloth over the canvas, right sides together, and sewed around the perimeter with a quarter inch(ish) seam, leaving about a 2" gap to turn it right side out. Backstitch at the start and stop.


Then turn right side out, making sure the corners are pushed out really well. Press, ensuring to turn under the seam allowances in the gap.

Top stitch around the whole perimeter about 1/8inch from the edge. For quilting and top stitching I use a longer stitch length of 4.5.

Lastly, use your snap tool to attach the snaps in the corners. I placed the teething pads on the straps and lined them up to make sure I was putting them in the right spot. If you don't have a snap tool, you could use sew on snaps, or Velcro instead.


The nice thing about these is that they are reversible as well!
Lions or terry cloth.... babies like choices, moms like two sides to get gross before washing
This is a great solution to avoid having to wash your whole carrier frequently. Just unsnap the teething pads and throw in the wash!
The lions are Stanley approved

Thursday 9 June 2016

Disney Quilt Swap Part 2

After finding out my original partner was ejected from the #disneyquiltswap four days before the shipping deadline, I had to expedite my usual stalking/brainstorming/creating process to make sure I was done on time.

My new partner was a fan of the Cinderella Castle at Walt Disney World since she got married there (lucky!). She had this poster in her inspiration board, so I decided to recreate it in her favourite colours. 


I added quilted fireworks in silver metallic, purple variegated, pink, and teal to match the colour story of the castle.

I also snuck in a hidden Mickey with glow-in-the-dark thread!


I made a Mickey Mouse label for the back again. Can't go wrong with the mouse! 


I made her a needlebook as well, from some Lady and the Tramp fabric, and included needles, wonderclips, a baby tiger needleminder and scissors with little pink Minnie Mouse bows.
Front
Inside
Back
I also made a pin cushion from a lion fabric that reminded me of the pride from Lion King. 

I somehow managed to get all this done in under a week, and got the package mailed out in time! Big thanks to my husband for taking the baby to give me the time I needed to finish. 
The complete package
From my partner, I received another awesome Ariel mini, this one with human Ariel walking out of the water in her shimmery dress. 

Now I have two Little Mermaid quilts; wouldn't you say my collection's complete?

Sunday 5 June 2016

Disney Quilt Swap Part 1

Before baby Stanley was born, I signed up for the #disneyquiltswap on Instagram. Since it didn't ship out until the beginning of April and baby was due mid February, I figured I would have plenty of time to plan, construct, and mail a mini quilt plus some extras to my partner.

My partner likes Mulan, especially Mushu and Crikee, so I dreamed up a mini quilt based on the first time they meet Mulan. That means fire, a dragon in shadow, and snarky quotes!

I created the background from 2" squares of yellow, orange, and red fabric placed in a gradient. Then I cut out silhouettes of Mushu and Crikee and used raw-edge appliqué to attach them to the quilt. I had to do a bit of embroidery for Crikee's legs and antenna, since they are way too skinny to cut out of fabric. 
Mushu
Crikee
I chose to use part of the Mushu quote "I'm not tiny, I'm travel sized for your convenience." I dropped the "for your convenience" simply because that was way too many letters to cut out! 

I had a brainstorm to try to make the quilting for this mini look like flames to evoke that first meeting scene even more. So using orange and yellow variegated thread, I free motion quilted flames all over the quilt. I used a black backing fabric to let the quilting pop. Last but not least, I made a quilt label in the shape of Mickey. 
The back with flame quilting
Mickey quilt label
Before mailing, I made a couple extra to include. I made a Beauty and the Beast needlebook complete with a rose needleminder, needles, wonder clips, and scissors. 
Front
Inside front
Inside back
Back
And because my partner likes Yzma from Emperor's New Groove, I recreated this scene:

I made an Emperor Kuzco flea, and painted two boxes to match the scene from the movie. This is such a fun and funny scene, that it deserved to be honoured with crafting! 

Then, with four days notice, I was informed that my partner had been kicked out of the swap! I had to start all over again for a new partner with less than a weeks worth of time and a newborn! My original partner contacted me and we agreed to do a private swap between the two of us, so this package still got to go to its rightful home.

In return, my partner sent me an Ariel mini quilt in the shape of a shell, a Mr. Tumnus cross stitched mini, and some awesome Harry Potter items. This was a super fun way to swap, as we knew that each other was sending to us, so we were able to post sneak peaks and get excited about our packages. 
Mini by Alyx Hashman
All these fabulous goodies!
Stay tuned for my next post showing what I made for partner number two!

Thursday 2 June 2016

Mini Mini Quilt Mania

Make Modern Magazine is hosting a mini mini quilt contest this month. Quilts can be no bigger than 6" square, which you would think would be limiting. But dang, I made one last night and the ideas just kept flowing!

When I first heard of the contest, the first words that came to mind were Mouse House. So I decided to run with it and create a mini mini with those words in mind. I knew right away I wanted to use the mouse on the bike from Mice on Bikes by Lizzy House. I explored my fabric collection for inspiration and started cutting and glueing away. In the end, I had a scene with the bike mouse leaving his house under the watchful eye of the cat in the moon. 
Mouse House
I laid the mini mini out with a tape measure and some sewing supplies to prove the size (5.5" square!). 

This morning I was all fired up to make another. Today I made a mini Polaroid block using a scrap of Briar Rose fabric left over from my B Rosie quilt. I embroidered Spring 2016 under the "photo", to replicate how people used to write on Polaroids, and I accented the photo with some French knot pollen dots. I finished this one with some mini pompom trim. 
Spring 2016 Polaroid
Again, I set up a little scene to show the size (3x4"!). I have a few other ideas rattling around in my brain, so this likely isn't the last mini mini quilt you see out of me!

Monday 15 February 2016

The Homemade Nursery: The Final Reveal

As you may remember from my post about my Nurture Hope quilt, I am quite fortunate to be pregnant.  My husband and I had been holding off on doing much in terms of preparation for the baby until we took holidays back in November.  Then we got started and have been plugging away every since.  I'm going to share individual projects we embarked on over the past few months, and then a final blog post with the big reveal of the whole room. 

The Homemade Nursery: The Final Reveal

The time has come for the Final Reveal of the baby's Homemade Nursery!  I am just in love with this space, and if the baby doesn't like it, I will quite gladly switch rooms!  So, let's take a tour, shall we?

Since we don't know the gender of the baby, we decided to keep the room fairly neutral.  As usual, I took to Pinterest to help generate ideas, and eventually we settled on a mountain forest theme, mostly because I saw an excellent geometric mountain mural I wanted to attempt.  This was our first project: paint the room, and try to become artists.  I must say that I am pleased with how it turned out!
The Homemade Nursery: The Final Reveal

The Homemade Nursery: The Final Reveal

You can see a mobile hanging above the crib; I made this with feathers from my friend's chicken coop (don't worry, I cleaned them), and shellacked oak branches foraged from the park near my house.  
The Homemade Nursery: The Final Reveal

On the wooden crib, you can see a collection of pillows: a mountain pillow that I made, and a gorgeous woodblock printed bear that was made-to-order from Laura Frisk's etsy shop especially for this baby. 
The Homemade Nursery: The Final Reveal

The Homemade Nursery: The Final Reveal
Laura hand carves the stamp from wood, and uses it to print the bear on the fabric..... simply amazing!
 There is also a sheepskin, the knitted leaf blankie I made, and an oh-so-perfect birch swaddler from Little Unicorn.  
The Homemade Nursery: The Final Reveal
So many great textures in this picture
Next, we have a nice little rocking chair area.  The rocking chair was a gift from my dad to my mom from when they were early in their relationship - the same rocking chair that she used to rock me and my sisters when we were babies.  I used a nice, thick sheepskin to cover the back, and replaced the floral seat cushion with a new oatmeal coloured one.
The Homemade Nursery: The Final Reveal

  I found the most perfect footstool handcarved from a teak tree stump.  
The Homemade Nursery: The Final Reveal

Beside the rocking chair is a side table that my dad had made many years ago from my grandparent's old dining room table.  On top, a lamp and a polar bear coin bank from my sister.  
The Homemade Nursery: The Final Reveal

Above, is a mountain shelf that my dad made with a few woodland knicknacks, including a tiny deer, a pinecone, a potted foraged pine branch, and an owl.  
The Homemade Nursery: The Final Reveal

The Homemade Nursery: The Final Reveal
I finished the shelf with beeswax.... it leaves the wood looking natural, but with a nice satin seal
Behind the rocking chair is a growth chart a friend made for the baby: she included a fox and a Charley Harper inspired pair of birds.
The Homemade Nursery: The Final Reveal

The Homemade Nursery: The Final Reveal

On the other side of the rocking chair are the bookshelves.  
The Homemade Nursery: The Final Reveal

We hung IKEA photo ledges on the wall to show off the covers of the children's books.  The illustrations of picture books are so beautiful and engaging, so this is the perfect way to store and display them. 
The Homemade Nursery: The Final Reveal

 Above the books are the antlers, in a featured place (due to their sheer size!).  
The Homemade Nursery: The Final Reveal

Looking up, the wood light fixture.  It took a little searching to find lighting that suited the room.  I wanted something made from natural materials, as opposed to a typical silver and glass fixture.  
The Homemade Nursery: The Final Reveal

Next is the dresser area.  
The Homemade Nursery: The Final Reveal

This refinished dresser really reflects the feel of the room.  It is modernized vintage, natural materials, and homemade(ish).  
The Homemade Nursery: The Final Reveal

Inside, I made drawer dividers to help keep baby's tiny things organized.  
The Homemade Nursery: The Final Reveal

Above the dresser I curated a gallery wall featuring art from local artists, myself, my mother-in-law, my sister-in-law, and some of my favourite artists (Including Dani of Begoodnatured, Jahna Vashti, Helen Ahpornsiri, Charley Harper, Teagan White and more).  I selected art that reflected a forest theme, so animals and trees that would be found in a mountain forest. 
The Homemade Nursery: The Final Reveal

The Homemade Nursery: The Final Reveal
Including: Charley Harper, local artists, Helen Ahpornsiri.  The diamond is a suncatcher I backed with fabric.
The Homemade Nursery: The Final Reveal
Including: Jahna Vashti, Teagan White, Marisa Redondo
The Homemade Nursery: The Final Reveal
Including: Teagan White, me, local artists, my sister-in-law, my mother-in-law, Dani from Begoodnatured 
The Homemade Nursery: The Final Reveal
The details in Dani from Begoodnatured's work are phenomenal.  No photo does her work justice.  The texture, the colours, the details.  I (and the baby) am so lucky to have one of her pieces on this wall.  
The Homemade Nursery: The Final Reveal
The nest and birds are part of a decoration from my bridal shower, and the "egg" is a stone that my dad found years ago in a stream that was naturally polished to almost perfectly round.  I have had it since childhood, and have always adored it. 
The Homemade Nursery: The Final Reveal
We splurged and bought an autheticated Charley Harper print.  Lucky baby.
The Homemade Nursery: The Final Reveal
This fabulous cross stitch owl is the work of my mother-in-law.  
The Homemade Nursery: The Final Reveal

My vision for the room was a lot about the "feel".  I really wanted to focus on bringing together lots of natural elements and textures, like fur, feathers, wood, and wool.  I wanted to keep the colour palette pretty neutral as well.  I love the whole vibe of the room; it is very cozy and I am very excited to share the room with the baby.  I asked my husband if he thinks the baby will like the room, and he says the baby won't notice until he/she is older, and by then they will want a Spiderman or Frozen themed room.  I told him that the baby will have to move to a new room then, because I love this one so much! 
The Homemade Nursery: The Final Reveal

So baby, we are ready for you!  We can't wait to welcome you into this world!