Showing posts with label tutorial. Show all posts

Monday, 4 July 2016

DIY Baby Carrier Teething Pads

I just got an Ergobaby carrier to do some baby wearing with Stanley, and the first thing he does once he is settled into it is start chewing and drooling all over the straps. This will not do. I can't tolerate crispy dried drool, but I also don't want to have to wash the whole dang thing after every few uses. I did a little googling, and sure enough, Ergobaby sells removable teething pads that you can snap over the straps. But seeing as my motto is "Homemade anything is better than store bought everything", and I have an abundance of fabric around here, I set to work making my own. And I took a few pictures along the way in case you want to make some, too!

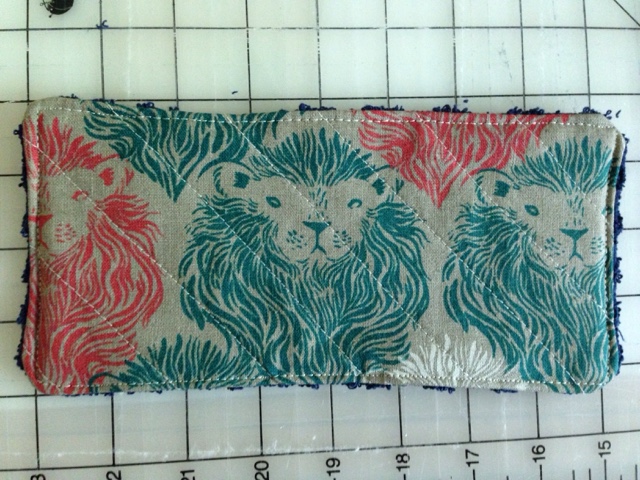
First gather your materials. I used a wash cloth, some scraps of quilt batting, and some canvas (Cotton and Steel lions), plus four snaps. 

I used my 9.5" quilting square to cut the washcloth, batting, and canvas into two sets of 9 inch x 4.75 inch pieces. I fussy cut the lions so that they would be centred on the strap, so depending on what kind of fabric pattern you select, you may want to be mindful of that.
I adore these lions
Next, I layered the canvas and the quilt batting and did some simple straight line quilting on the diagonal. 

Then I layered the washcloth over the canvas, right sides together, and sewed around the perimeter with a quarter inch(ish) seam, leaving about a 2" gap to turn it right side out. Backstitch at the start and stop.


Then turn right side out, making sure the corners are pushed out really well. Press, ensuring to turn under the seam allowances in the gap.

Top stitch around the whole perimeter about 1/8inch from the edge. For quilting and top stitching I use a longer stitch length of 4.5.

Lastly, use your snap tool to attach the snaps in the corners. I placed the teething pads on the straps and lined them up to make sure I was putting them in the right spot. If you don't have a snap tool, you could use sew on snaps, or Velcro instead.


The nice thing about these is that they are reversible as well!
Lions or terry cloth.... babies like choices, moms like two sides to get gross before washing
This is a great solution to avoid having to wash your whole carrier frequently. Just unsnap the teething pads and throw in the wash!
The lions are Stanley approved

Thursday, 14 May 2015

The Homemade Heart's Guide to English Paper Piecing

I've had some questions about how I make the La Passacaglia rosettes, so I decided to put together a quick tutorial. First of all, I want to assure you that You Can Do It!

English Paper Piecing (or EPP) is very easy, and very accessible, as you don't need any fancy or expensive tools. I will show you what I use, but even that isn't a hard and fast rule, it's just what I have become comfortable with. Adapt and use whatever makes you happy.

The pattern for the La Passacaglia quilt is found in the book Millefiori Quilts by Willyne Hammerstein. 
My well-loved book, and my templates page

My copy came from PaperPieces.com. They also sell the little paper pieces to make the quilt, but you can cut them yourself. That's what I did. I photocopied the template included in the book many times and cut them all out to fit as many as I could on a single page of card stock. Then I cut out all the pieces. Easy peasy. You need many more of the "E" triangles than are in the template, so I used the scraps of the card stock to cut extras. 

These are all the supplies I could possibly use to make rosettes. 
The supplies
1: A carrying case to hold all supplies.
2: A needlebook filled with needles. I like to use "betweens" because I find them to be thin, sharp, and decently sturdy. Also, the eye isn't very large, so it passes through the fabric without making a huge hole. 
3: A Sharpie pen to aid in fussy cutting (see the link at #12 for more info).
4: A small rotary cutter for cutting fabric. Or a large one. Or use scissors. 
5: A glue stick for glue basting. I use good old Elmers. 
6: A compact mirror to aid in fussy cutting. This tutorial helped me immensely!
7: A seam ripper. Because sometimes even the best of us make mistakes and have to rip stitches. 
8: Embroidery scissors for cutting threads. 
9: Thread for sewing. I like Gutermann hand quilting thread because it is so smooth. I chose a light grey that kinda just goes with everything, that way I don't have to constantly be changing thread colours. 
10: Wonderclips make your job so much easier when holding pieces together for sewing. They are strong and small, so they don't get in your way. 
11: Paper pieces. Like I said, you may buy them online, or just cut them yourself from card stock. The ones online are "laser cut" which makes them more accurate than handcut pieces, but I don't find that it makes a difference. I guess it just depends if your time printing and cutting tiny pieces is worth more than just buying a set. You can reuse pieces as well. Once a piece is sewn in on all sides, the paper can be removed. Don't worry about the glue, the fabric peels right off easily. 
12: Fussy cutting templates. I made my own (see this tutorial to DIY your own set). You can buy these online as well, and they are fancy acrylic ones. But I couldn't justify the price, personally. 
13: Fabric scissors. See #4 above. 
14: A needle minder and elastic band. I constantly misplace my needle, so a magnetic needleminder is very helpful to keep it readily available. The rubber band helps when you just put on hand lotion, or your hands are sweaty, and you just can't get a good grip on that needle! Use it as a grip assistant. It will help save your nails too (I find mine get all ragged when I am trying desperately to grab hold of a slippery or tightly jammed needle). 
15: Fabric, to make all your beautiful pieces! 
16: Self-healing cutting mat to use with your rotary cutter. No scratching up your tabletops, and it preserves the life of your blade, too. 

Like I said before, this isn't a hard and fast list. You may scoff at some of my items as frivolous and unnessesary, or you may be outraged that something is missing from my list. Use what you are comfortable with. 

Now that our supplies are all assembled, let's talk about making pieces. 

Your first step is to use those fussy cutting templates and a sharpie pen to locate and cut the pieces from your fabric using your rotary cutter and cutting mat, or scissors. Next, centre and glue down the paper piece onto the wrong side of your fabric. Then, run a thin strip of glue down each side and fold over your fabric edges. This is called glue basting. You can also thread baste (which I used to do), but I find glue basting is much faster. 

Now you are ready to sew. 

Place your pieces right sides together with the wonderclip on the side you will be sewing. Make sure your edges are lined up! I like to thread my needle with one strand folded in half, with the two tail ends through the eye of the needle. 
The Whip Stitch
Then I poke the needle through the right hand corner of the pieces (picture 1), draw it through, then pass the needle through the loop at the end of the thread (picture 2). This way the thread is locked without having to tie knots. Then I move over about an 1/8th of an inch, and poke my needle through again, always from the bottom to the top (picture 3). Keep doing this same stitch, bottom to top 1/8th of an inch apart along the whole edge (picture 4). This is called whip stitch. You want your stitches to be as uniform as you can make them, and try not to poke through the papers. Your are hugging the edge with your stitches. 

When you get to the last few stitches, you want to lock off your thread.

Poke your needle through as usual, but bring the needle back through the loop of the thread where it is entering the piece (picture 1). This secures the thread without tying any knots. Do this for the last 2-3 stitches. When you get to the end, bury your thread in the back of the piece by passing the needle under the seam allowance (picture 2). Make sure you don't go through the paper, or the front of the piece! Trim the thread. Open up your pieces and admire your handiwork (picture 3)! 

I like to go round by round when making my rosettes. I first cut and glue baste all my pieces, then sew them together according to the pattern. Once the round is complete, I attach it to the rest of the rosette, going piece by piece until it is all sewn in. 

This is a super fun project, and I am sure that anyone could do it if they so desired. As you can see, it isn't very difficult, and it doesn't require expensive, elaborate tools. It does take time though. Don't expect to whip through this quilt in a week! This is the kind of project where you savour each step and each stitch. 
My current WIP rosette

If you want to read more about this project, head here for the complete index!

Sunday, 15 March 2015

Let them eat cake! (And sew it, too!)

As you may have seen, I made a birthday cake block to share as my 52 Quilters contribution.
You can read all about it here

I was inspired by this pattern, but had to design my own to accommodate the size specifications, and my desire to have three candles.

So I set to work using Excel to plan out the picture. I decided each square would represent a quarter inch, so it was easy to figure out what size to cut all the pieces.

I cut and sewed the pieces together in groups from the bottom up. To make the angled corners (pieces B, E, H, M), line up the square pieces over the base piece and sew along the diagonal of the square, then press open.

At the end of building the block, I sewed long strips along all four sides, then squared up the block so that it measures 8.5x8.5 inches. 

If you use this pattern, please let me know how it goes! I planned it out initially, and amended as I went, but I haven't "tested it", so to speak. So if you try it and find any mistakes, please tell me. Or if you try it and don't find any mistakes, let me know that too! 

Tuesday, 3 February 2015

DIY: Fussy cutting templates tutorial

Since starting this La Passacaglia madness as my 2015 Project of the Year, I have realized the great necessity of reusable clear templates to use for fussy cutting. I see lots of people buying acrylic ones online specifically for this project, but I figured there must be a homemade way around spending $38 (plus shipping) on five pieces of plastic. And guess what? There is! 

Step one: Gather supplies

You will need:
- a sturdy plastic report cover (mine is from the dollar bin at Walmart)
-a ruler
-scissors (but not your fabric ones!)
-a sharpie pen
-a razor blade
-the paper pieces you need templates for

Step two: Trace 

Trace your paper pieces onto the smooth side of the report cover

Step three: Add seam allowance 

Use your ruler to measure and draw a 1/4" seam allowance (or whatever size is your preference) all the way around the tracing. 

Step four: Cut them
Cut out the piece on the outer line of the template. 

Step five: Etch them

Use the razor blade to etch over the inner line. Don't press too hard, you don't want to cut all the way through. 

Step six: Clean them 

Using a damp tissue, wipe clean the marker lines from your templates. 

Step seven: use with confidence! 

To use these templates for very precise serial fussy cutting, place the template over the fabric and centre the area you want to feature. Then use your sharpie pen to trace a couple features of the fabric onto the smooth side of the template. Use this tracing to line up the next piece and cut around it. This way, you can have all of your fussy cut pieces look exactly the same! 

I am so happy I figured out a DIY homemade solution for these templates.  Especially with the Canadian dollar dropping so much right now, I just couldn't justify spending the money on importing the acrylic version.  If you use this tutorial to make a set for yourself, I would love to hear how it goes!

Friday, 3 October 2014

On the (beautiful) rag: a cloth pad tutorial

Since having surgery, I am temporarily restricted in my options for dealing with menstruation. Typically, I am a huge fan of the Diva Cup, and use that as my primary, with some homemade cloth liners as occasional backup.

I never use tampons or disposable pads. They are seriously disgusting to me: the weird smell (is it supposed to flowers or baby powder?), the health risks (TSS from tampons, god knows what chemicals/bleach), the environmental impact (those things don't break down in landfills), and let's be real: neither pads or tampons are even remotely comfortable. When you bring in cost (I've invested a ridiculously low $75 on lady products in the last 10 years) and convenience (my Diva Cup is always available, no dodgy emergency runs to the store for tampons), it was a no-brainer switch for me. So being without for a couple cycles is hurting my heart a bit. But, I have a solution!

I made my own (beautiful) cloth pads! 

Oooh la la!
I have made cloth panty liners before, and I love them. They are so much more comfortable than any disposable product available. But they aren't very absorbent. They are adequate for spotting, but I wouldn't trust them with any heavier flow. So I gathered some supplies and set to work. When my first pad was a success, I decided to share a little tutorial, just in case I can inspire anyone else to give these a try. 

The first step is to gather materials. I got everything from Walmart, because low prices really appeal to me. I chose cotton fabric for the tops because cotton is nice and absorbent and feels good against your skin. I picked busy patterns in browns and pinks because sometimes I'm lazy about scrubbing set-in stains, and this way if any staining does occur, it will be camouflaged by the pattern and colour. For the inside lining, I bought the cheap cotton terry hand towels (2 for $4!). When selecting a fabric for the backing, it is best to use something that is non-absorbent so that it keeps your undies clean. I bought a microfleece throw for $5, because it doesn't absorb fluids, and its fibrous texture helps hold the pad in place. You will also need thread in a complementary colour, and snaps for the wings. For the snaps, you can get either the sew-on metal type, or plastic snaps. The plastic snaps require a special tool to attach them, so if you decide to go that route, make sure to get the kit. Also, print this pattern and cut out the pieces.  

The supplies
Fold the towel in thirds and using the lining pattern, cut out three layers of terry cloth. Three layers would be good for a regular flow.  If you have a heavy flow, you may want to cut more layers.  If you have a light flow, or want to make liners, you can use less layers too. Part of the beauty of homemade is that you can customize to meet your needs!


Using the pad pattern, cut out one piece from the cotton and one from the fleece. 


Now it's time to move to the sewing machine. Sew along the perimeter of the terry linings with a zigzag stitch. Sew as close to the edge as you can manage, and overlap your beginning stitches with your end stitches.  It doesn't have to be beautiful or perfect, as it is just going inside the pad and no one will see it. 

Take the liner and centre it on the wrong side of the cotton and pin it in place. Sew along the perimeter of the lining with a straight stitch. Then, if you have a fancy sewing machine with fancy stitches, select one to stitch down the middle. If not, a straight stitch will do just fine.  Make sure you tack down or backstitch the start and end of your stitches to lock them in place.  


Next, layer your pad front and back pieces with the right sides together and pin them in place. Sew along the perimeter of the pad with a straight stitch (remember to back stitch to lock it in!) leaving a quarter inch seam allowance, and leaving one end unsewn. 

The scissors are showing where I left the pad unstitched.  

This is so you can turn it right side out, which you should do now. Smooth out the seams from the inside using your fingers or a pencil. Hand sew closed the opening you left, turning the seam allowance to the inside. 


After you secure your hand stitches with a couple knots at the end, bury your thread, and trim the ends.

Poke your needle in between the layers and up through the top to bury your thread.
Head back to your sewing machine to tack down the layers in your wings. Sew along the perimeter of the wings using a straight stitch and a quarter inch seam allowance. Again, make sure you back stitch a couple stitches on either end to lock them in place. 


Tacking down the layers keeps the wings looking neat
Last step is to attach the snaps. I used plastic snaps because I hate sewing in metal snaps. The plastic ones are super easy to use. Figure out where you want to place them by folding over the wings to the back and seeing where they overlap. Typically, they will be placed close to the end, near the seam allowance. 

Fold over to test snap placement
Using the awl provided in the snap pliers kit, puncture a hold in the fabric where you want to place the snap, and poke the pointy ended snap piece through the hole. 

Using the awl
Use the pliers to attach the other piece of the snap, following the directions of your snap kit. 


Squeeze it tight!
Do the same for the other side, making sure you place the snaps on the fabric and face them the right way so that they will meet properly. 


The snaps need to be able to meet in order to work
Now step back and admire your handy work!! 


Ooooh la la! Front and back, snapped and unsnapped!
Make a whole set to get you through your next period and enjoy the satisfaction of knowing you made them yourself, they are environmentally friendly, cost effective, and much more comfortable! 


The whole collection
Make sure you wash these pads at least once before use. The more you wash them the more absorbent they get. It is better to not use fabric softener with them because that can affect their absorbency as well. After you have used them, rinse them in the sink under cold water and scrub them against each other until the water runs clean. If you do this right away, you won't typically have any staining. If you do end up with stains, give them a scrub with a bar of sunlight soap to get them back to looking new. Or, if you are lazy like me, ignore the stains, since the fabrics camouflage them anyway. Then toss them in the wash with your regular laundry. Easy-peasy! 

If you have any questions about cloth pads or the Diva Cup, I would be happy to answer them. If you are interested in using cloth pads, but aren't very handy with a sewing machine, there are many shops on Etsy that sell them, including mine, TheHomemadeHeartShop !