Monday, 29 December 2014

52 Quilters

I recently heard about an interesting project in the works for 2015. Chris Webb had the great idea to start Twitter and Instagram accounts, and a blog called 52 Quilters.  He invited quilters of all different ages, skill levels, and quilty background to take over the accounts each week. They will share photos, stories, and inspiration with followers, giving a glimpse into their creative life. Also, they will make a patchwork square to contribute to a quilt that combines all their collective talent into one amazing quilt! Sounds like fun, right?

I decided to take a risk and applied to be a participant. And guess what? I was accepted! I get to take over from March 2-8, which coincides perfectly with my 30th birthday. What a fun and exciting way to celebrate this milestone! 

I hope that this project is a big success, and inspires existing quilters to continue excelling in their craft, and encourages future quilters to try their hand at it. 

For more information, and to follow along all year, go to 52quilters.com, follow on Twitter @52quilters and on Instagram @52quilters .

Saturday, 27 December 2014

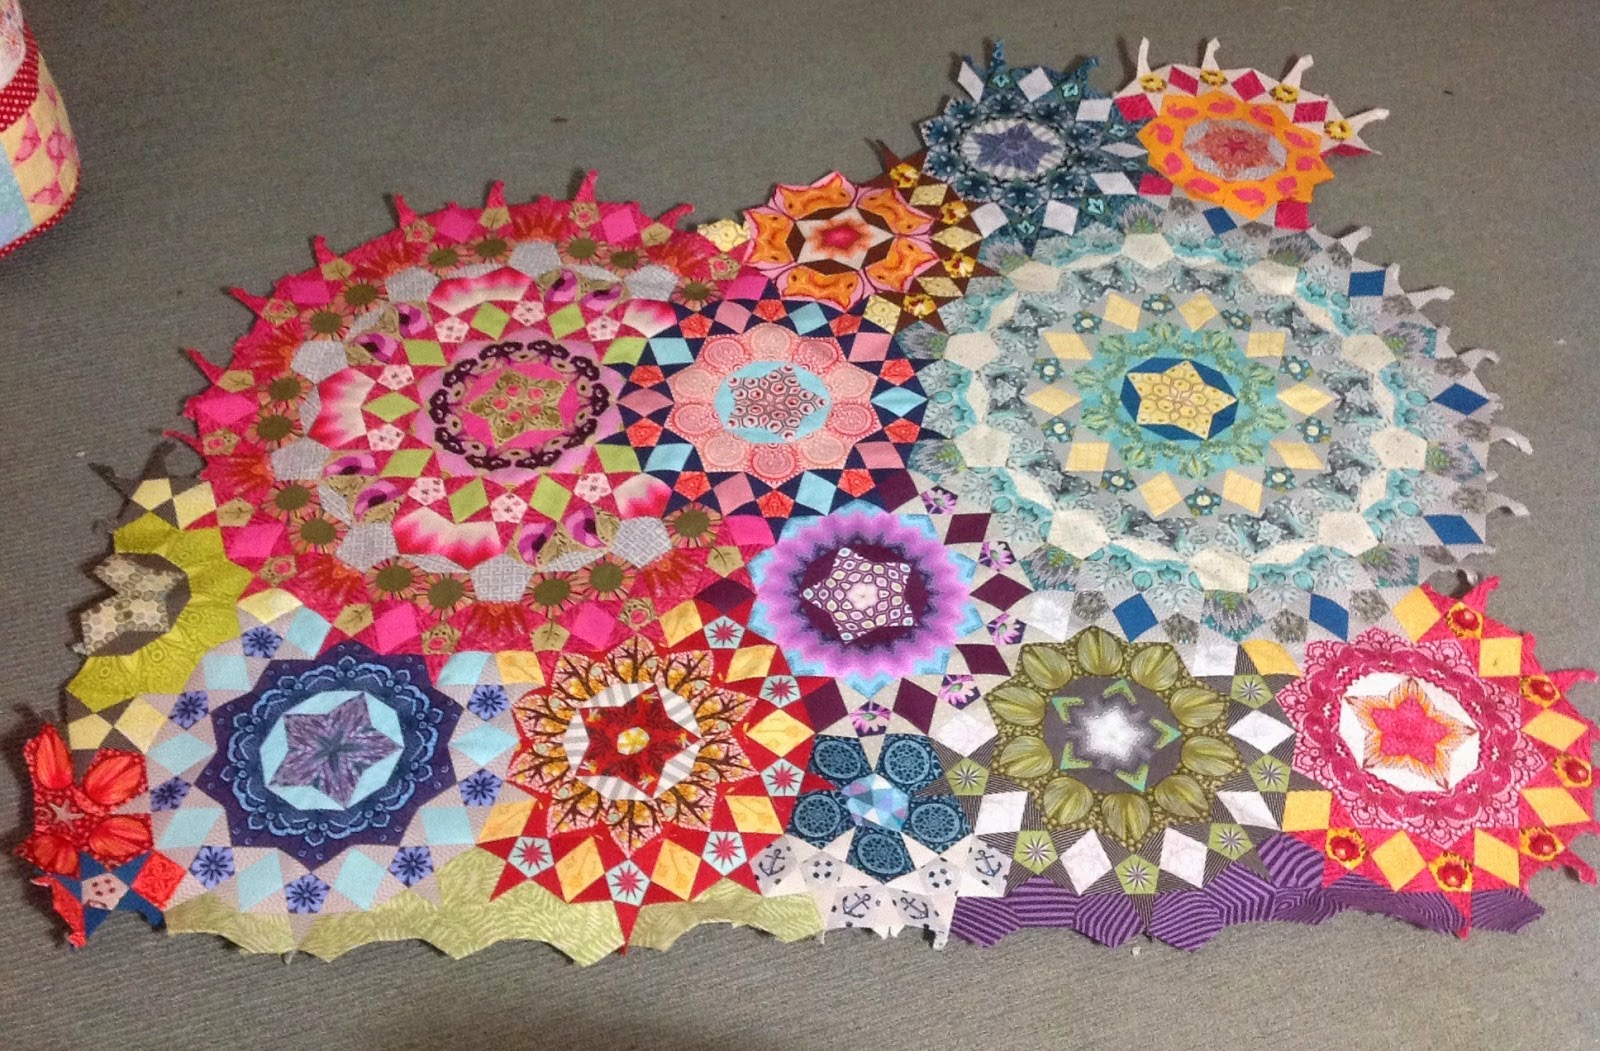
2015 Project of the Year: La Passacaglia Quilt

Oh my goodness. I can't contain my excitement! My amazing husband got me a wonderful Christmas gift: Millefiori Quilts by Willyne Hammerstein
I have been aching to give one of the La Passacaglia quilts a try, and now I can! He was also a total gifting champ, and bought me not one, not two, but four (!) bundles of fabric collections I have had my eye on. This gives me much fodder for this epic quilt!

La Passacaglia quilts look like a beautiful, colourful kaleidoscope, with so much potential for fuzzy cutting.  They are made using the English Paper Piecing technique, which means they are completely hand sewn. And the total piece count is over 2900! Last night I started cutting up the paper templates. I spent a good three hours at it, and have barely made a dent. 
I plan to have this quilt be a work-in-progress over the next year (or more if necessary!). This on-going project has me very excited, so stay tuned for progress updates!

For the complete list of related posts, head over to :

The Homemade Heart's La Passacaglia Quilt Index


2014: final inventory

Every year I like to set some intentions for myself in the coming year. Sometimes it is a goal to achieve, a mantra to remember, or an overall feeling to embrace. I hesitate to call them resolutions, because those are for breaking. Also, I don't necessarily want to go about it in the "set S.M.A.R.T. goals" mentality. I just want to have a mindset of improvement, exploration, and fun.

At the end of the year, I like to take inventory of how those intentions worked in my life, and where I stand with them. This helps me to decide what areas to work on for the upcoming year. 

Read more
Inspired by my cousin in 2013, I had set a goal to read 24 books that year. I met that goal, but finished my last book right at the deadline. For 2014, I wanted to match or exceed that goal. I read 33 books, including audiobooks, which I listen to while sewing, knitting, and doing chores. In 2015, I would like to exceed that number, but I can see it being difficult.  I did have a good three months off this year to get some aggressive reading done!  As long as I read 24 or more, I will not be disappointed.  

Do less (so I can do more)
I found that I was often taking on more than I could handle, and I ended up feeling too busy and overwhelmed, which resulted in no time to do the things that matter most to me. In 2014, I wanted to free myself from the hustle and bustle of a busy life. I wanted to restrict how much I volunteer to take on extra tasks, allow myself to say no to attending events I am not truly interested in, and stop feeling obliged or guilty to make plans. I also cut back my work schedule from 5 days a week to 4 days. 

This change has been enormous for me. So often, I would feel frantic and overwhelmed trying to fit everything in, and now I feel that much less. I was unhappy having a messy house, eating more convenience foods, and not having much time for true leisure. That extra day off a week has helped so much, my house is tidy and therefore more peaceful and comfortable to me. My husband and I eat better because I take the time to plan and shop for healthy meals. I have more time to enjoy creating and reading and loving. And giving myself permission to stop feeling guilty about saying no has been the most freeing thing. Also, freeing my mind from the "I should be"s has been liberating; no longer do I worry that I "should" be making wild plans for my weekends, because other people I know, or people in the movies do. I am happiest at home with a quiet project to work on, or a book to read and there is absolutely nothing wrong with that (or with me).  In 2015, I plan to continue with my Less is More mentality.  It is really working well for me.

Practice patience
This is an area that I definitely needed (and honestly, still need) improvement. I try to remind myself to practice patience during those times when I am annoyed standing in a line, or stuck in traffic, or dealing with a difficult person, or feeling hangry if I haven't eaten. I have to remember that the world doesn't revolve around me, everyone has their own shit going on, and that my mood is my choice. 

Relax
Again, with the glorifying of busy comes the guilt of relaxing. So this goes hand-in-hand with Doing Less. I gave myself permission to freely enjoy some sewing, knitting, reading, or just sitting and doing nothing. Even if there is something else I could be doing. Because rest is just as important as work. 

Mortgage Free by 33
This is a bit of a mantra in our house. I acknowledge that it is extremely likely that it won't happen, but I like the rhyme. Basically, we want to pay off our mortgage early, so we make extra principle-only payments on our mortgage.  This past year was a little tough, as we had a reduced income while I was on medical leave, but we still managed to pay $1975 extra. 

Live life today (don't wait for kids, your life isn't on hold)
This is a major problem for me. We have been dealing with infertility for almost three years now. It sucks. It's painful. And it has our life in a bit of a stall. I have a hard time committing to long term plans, because I am always so hopeful to be pregnant, or have a new baby. I have passed up opportunities because of a potential pregnancy that never happens. I made some progress in this realm this past year. We did manage to take a trip to Disneyland and Hawaii that otherwise I probably would have kept putting off. And it's a silly thing, but some of the fabric that I have been hoarding for when I "one day" have kids, I have cut into. So needless to say, I still need to work on this area in 2015. 

Take control of health and body
This was a major area of improvement for me this past year.  Taking initiative and fighting for proper medical attention and care was a hard battle, but so worth it in the end.  Having surgery was scary, and not exactly on my goal list, but the results have been amazing so far.

All in all, I think 2014 was a hard year, but one with lots of personal and spiritual growth.  I look forward to 2015 and all that it has to offer!  


Friday, 26 December 2014

Sewing without a pattern? I too like to live dangerously!

Sometimes I like to live on the wild side. And by this I mean sew something without a pattern. My husband asked me to make a bag for his mom for Christmas to replace the gift bag she has been using to carry her iPad, wallet, and miscellaneous stuff back and forth to work. So I had a general idea about size in mind, but otherwise was working from a figure-it-out-as-you-go place. 


I started off with Bluebird Park from Kate & Birdie Co with Moda Fabrics. I love the colours, textures and adorable animals from this line. In fact, prior to knowing about the fabric collection, I had used cards with the hedgehogs and bunnies for my wedding shower thank yous! 

Next, I decided it would be cute to fussy cut some of these designs into 2 inch hexies to feature them on the bag. I hand sewed them together using the English paper piecing technique. 
English paper piecing means all hand sewing
I decided to wrap this patchwork around the side of the bag to add interest in the front and back. I chose the dark cross hatching fabric to fill in the remaining of the patchwork portion to give contrast to the business of the hexies. I also selected a dark brown to use as the base, handles, and lining of the bag. 
The layout
I used a decorative stitch from my sewing machine to dress up the handles, and the pocket I installed on the inside.
Handles close up
A peek inside - a pocket perfect for an iPad
I used a blanket stitch on my sewing machine to applique the hexies to the background fabric and the base. 
Blanket stitch applique
Initially, I was going to square off the hexies by cutting around the perimeter to make all the lines straight. But when I was laying out the bag, I decided to keep the hexies intact for more visual interest. I think that this was a good idea; I love the way it looks, especially at the top where the handles attach to the hexies.

Front view


Back view
Lastly, I used a magnetic clasp for the closure, and used the blanket stitch to top stitch around the upper perimeter of the bag. I filled the bag with little treats that my mother in law will like, and wrapped it up for Christmas. I sure hope she likes it! 

Thursday, 25 December 2014

The best gifts are Homemade

Homemade gifts are my favourite to give and receive. I love knowing that someone worked hard and poured their heart into something made special for me. And I love working hard and pouring my heart into something made special for someone else! 

My mom had said she wanted a tote bag for carrying crochet projects, so I set to work whipping something up for a Christmas gift. I chose these fancy foxes for the main part of the bag, since she had told me before how much she liked them. 
Dapper foxes
I paired them with a darker grey for the base and handles. 
Front view
I used heavy interfacing for the base, but medium for the sides, which allowed for greater flexibility of the bag, while still allowing it to stand up on its own. I opted for a funky button from my extensive button collection (inherited from two different grandmas who were borderline hoarders). The loop closure I paired with the button is a hair elastic that matched the dark grey.  
Funky button clasp
I made excellent use of the decorative stitches my sewing machine is capable of executing, and jazzed up the handles with rows of Xs. 
Fancy handles
This bag came together much quicker, and with less mistakes, than my previous bags. Gotta love getting over the learning curve! I stuffed the bag with fun little goodies my mom would like, and wrapped it up for Christmas. I can't wait for her to see it! 

Wednesday, 24 December 2014

Cats.....in jeans?!

One thing that I love about having a goddaughter is that I can do special things just for her without feeling guilty for not doing the same for everyone else. So at Christmas time, along with a gift from my husband and I, I like to have a little something from me to her. And as far as I am concerned, homemade gifts are the most special. So this year I decided to make her a little cat stuffed toy. Wearing jeans. Oh my goodness, the cuteness!

I started out drawing a pattern that I liked. It took a couple drafts and a lot of erasing before I was happy with the look of the face. 
Face on the left was rejected, face on the right was approved
Then I set to work picking fabric. I had some scraps of a grey flannel with fun little light grey circles that I thought would serve well as the face, tail, and legs. I used white flannel to make the white patch on her face, and her arms. I am absolutely in love with Violet Craft's Brambleberry Ridge line, so I used the purple plaid for her shirt. A pair of old jeans of mine became new jeans for the kitty, complete with back pocket! 
Look at that little butt!
I put together the face using felt for the ears and nose, and embroidered the eyes, mouth, and whiskers. Looks pretty good! 
Pretty cute!
One thing that I am terrible at when it comes to making stuffed toys is taking the seam allowance into consideration when laying out the face. I think this cat above looks so cute.... Then I sew it all together, and I think it loses something. 
A little bit alien looking.....
I think I need to leave a larger seam allowance to accommodate the design better. Oh well, I still think she is cute, just different from what I pictured the final result would be. 
Front view
Back view - I love the tail!
And of course, the obligatory staged photos. Here, the kitty is helping me make cranberry sauce for Christmas dinner. Cats love cranberries. Now let's hope that Briar Rose loves her cat!
Such a helpful little kitty
Annyong likes her!

Wednesday, 10 December 2014

Aloha Hawaii, Aloha Quilts!

My husband and I were lucky to enjoy an amazing holiday in Disneyland and on Maui, Hawaii. We got back last week, and I am still dreaming about it! Disneyland was so special; this was my first visit, and I enjoyed it very much. It was amazing from my inner child's point of view, as well as my adult point of view. All the characters and themes rides: it was my childhood come to life. And then the grownup part of me loved how clean it was, how friendly the cast members are, and how handi-accessible it is. Every ride and attraction is open to every single person, and they are so helpful to people with wheelchairs. Also, one of the live shows had sign language translators! It is so interesting to me how inclusive Disneyland is; it's truly a magical place.
Me in front of Sleeping Beauty's Christmas castle
Pete and I about to watch the World of Colour show
After thoroughly enjoying Disneyland, we hopped a plane over to Maui for a week's stay. This was our second visit, our first was for our honeymoon two years ago. It remains a beautiful, romantic, relaxing place. One morning we woke up to the most amazing sight: a super bright and vivid double rainbow!
Double rainbow.... what can this mean?
I put my handsewing kit to good use and finished a flower block using Violet Craft's Brambleberry Ridge line.  

Love those woodland creatures
I really enjoy English Paper Piecing!  It is perfect for relaxing on the porch enjoying a sunset.

I can not get enough of these Hawaiian sunsets
Besides enjoying the sun and water, we hit up our favourite restaurants from last time, and discovered a few new ones. We also ventured out in search of record stores for my husband and quilt shops for me! My favourite one we found was The Maui Quilt Shop in Kihei.  This is a cute little shop with lots of interesting things to look at, reasonable prices, and super friendly staff.  They also offer classes, which had I been there longer, I would have definitely taken part in.  It was here that I learned quite a bit about Hawaiian quilting.
Carnation quilt
Hawaiian quilts are beautiful works of art, different from any other style of quilting I am familiar with. They are made by cutting a large piece of folded fabric, rather like a paper snowflake. The design is unfolded and appliquéd onto a backing fabric. The design is quilted over first to give depth and interest to the design, and then echo quilted around the outer lines. Everything is done by hand, from start to finish. Once a quilt is finished, the last step before gifting it to someone is to sleep under the quilt for a night.  This ensures that the quilter's spirit resides in the quilt. I think this is such a sweet idea, and one I really like the idea of introducing to my own quilt making/gifting. One Hawaiian tradition I don't think I can get on board with though, is the belief that it is bad luck to make a quilt with more than three colours.  I like a colourful quilt!  While this is the tradition, I did see lots of quilts with a modern take with more colours, and fresh patterns.  I learned a lot about the traditions and techniques of Hawaiian quilting, and bought a pattern to give it a try myself. 
Traditional quilt pattern, and a kit to make the whale mini wall hanging
I think this will be a challenging venture, but one worthwhile and rewarding.  What a great souvenier from another wonderful trip to Hawaii!

Tuesday, 18 November 2014

Feelin Good on a Wednesday: Mini Quilts

I recently signed up for a mini quilt swap on Instagram hosted by Schnitzel & Boo


This is a fun project where you are assigned a secret partner, and someone else is secretly assigned to you. You get to know your partner from their sign-up questionnaire, their Instagram feed, and any other social media they may participate in (such as Pinterest). Then, using your new-found knowledge, you make a quilt for them and send it to them by mail! So far, I have been having a lot of fun getting to know my partner, and thinking about what to make for them.  

Here is some of my inspiration:

Feathers by Alison Glass
Arcadia Avenue by Sassafras Lane

Woodcut quilt by Bijou Lovely
These are all large quilts, so I would do a smaller version, or just a single block in the case of the Sassafras Lane quilt. These quilts are all foundation paper pieced, which means I would have to learn a new technique. But that has never stopped me before! For colours, I was thinking blues, greens, and greys, like this colour palette:

{leeked tones}
I found this fabric bundle of solid colours that I think would be perfect (less the purple)!


Winter bundle from Pink Door Fabrics
I do like the idea of having some patterns mixed in as well though, so I may want to add in some other fabrics. So while I'm enjoying Hawaii, I am going to be percolating on what to do, and what fabrics to use. Also, checking out the Hawaiian quilt shops for some inspiration!

Wednesday, 12 November 2014

Feelin' Good on a Wednesday: Cables

I changed my mind about taking some knitting with me on our trip to Hawaii. I'm just not sure I can go the two weeks without some needle work! My current project is my husband's Game of Thrones blanket. I am in the midst (still) of the wolf panels, but these are far too big to take on a plane. I'm not kidding, there are four balls of yarn on the go for these!
Way too much for carry on-this would not fit under the seat!

So I decided to start on the cable panels, because these will use just one colour of yarn, and I will knit from both ends of the ball for the two panels, instead of having two separate balls. I want the cables to be chunky and manly to go with the direwolves and "Winter is Coming."

This is my short list of contenders:
The winner is...... The horseshoe cables! I like the chunkiness, I feel like the braids and the celtic cables look too delicate.  The twist I thought was a little boring. The horseshoes just feel right!

I started on the panels to make sure I like them in action, and also that my husband was okay with them. When I showed him the cables and asked if they made him feel manly, he grunted. That's man for yes. 
Gotta love these delicious cables!

Monday, 10 November 2014

The ocean was always you: a quilt refashion

My husband's cousin lost her mother to a hard battle with breast cancer a few years ago. I love and adore Renee so much, she was such a special person, and I always found her so supportive and smart, and a real pleasure to be around. I miss her, and I thank her for getting to know her (as short a time as I did), as I feel like she really opened my eyes to having an authentic and honest existence, and appreciating the beauty in the world. She is a woman to be admired and loved. So when Angelique approached me about refashioning a memory quilt for her, made from her mother's clothes, I was honoured to be able to take on this project in memory of such a great woman. 

Angelique had the original quilt made shortly after her mom passed away, wanting something beautiful that she can snuggle up with and take comfort from. The quilter made a quilt with large squares of stripes, and backed/bound it with a blue sheet. 
The original
She hated it. She didn't like the colours and the way they came together, she hated the blue sheet backing, and in hindsight, felt the size was too large. She put it away in a closet and didn't ever use it. And that isn't what you want for a memory quilt representing your mother!  So I took it home with me and percolated for a while with it. 

She wasn't thrilled with the pinks and floral patterns as part of the main quilt. And she wanted something more modern. I saw that there were lots of blacks and blues and greys and whites, and started thinking of the ocean at nighttime. Then I saw this quilt on Pinterest, and thought "Perfect!" Also, I found this poem to be very inspiring. 

Isn't that so fitting for mothers? It's true that no one is as vast and important and mysterious and beautiful as your own mother. Just like the ocean. So I kept this in mind throughout my work on this project. 

My first step was to create a draft to show Angelique for her approval. My concept was to use the black fabrics as the night sky, with the white fabrics as the moon. The blues, greys, and black/white patterns would be the ocean, and below that, the greens, browns, reds, and pinks would be the earth. 
The layout

 She liked the plan, and so began the arduous task of hand ripping stitches to take apart the quilt piece by piece.  
Annyong was "helping"
Separated and sorted
After I had the quilt in pieces, I ironed and sorted them into colour groups, then began trial layouts. 
My bed is my design board
I ended up omitting the pinks from the earth portion, they just didn't work. My plan was to incorporate them into the back. Then I sewed all the pieces together. I found this to be a real challenge, as the different types of fabrics have different degrees of stretch. After I had it all together, I learned about using stabilizers when dealing with tshirt materials. That would have been nice. I hand appliquéd the moon in place after using fusible web to fix it to the quilt. We decided against incorporating stars into the night sky. I also decided to add a black border all the way around. 
The front with no border (yet)
Then I turned my attention to the back. I had all the pink fabrics left, so we decided to do a horizontal stacking coin row to liven up a black-on-black backing fabric.
The back
Great! Time to baste! I laid everything out on my dining room floor to make the quilt sandwich. Originally, we were going to reuse the sheet that had been used for backing as the stuffing, but it was too slippery, and it would have made quilting difficult due to shifting. Instead, I ended up using a thin fleece blanket to keep the weight down. At this point, I sent pictures to Angelique for final approval. She decided that she wasn't feeling having the earth portion on the quilt front, she felt like having just the sky and water was more soothing for her. I'm glad I checked in before basting! I took apart the earth from the sea, replaced the borders, and set to work basting. 
With the earth
Without the earth (and basted)
I used wavy line quilting over the ocean part with varied spacing between lines to make it look like waves in the water.
Close up of wave quilting
I used a walking foot for this, and this is the first time I have quilting using it. It sure made quilting a breeze! Until I got to the sky. When I took apart the quilt, I knew I was going to be using the black all together as the sky, so I didn't seperate each block from the panels, but left them all sewn together in long strips. This was a mistake. The previous quilter had attached old sheet pieces as a stabilizer, but left lots of excess material loose in each block. This means when it came time to quilt the sky, I ended up with huge bunching at each seam between blocks. 

This looks terrible!
At this point, I was feeling very discouraged, and contemplated telling Angelique that we had a fire and the quilt was lost. I couldn't give her a quilt that looked this terrible! I was so embarrassed that it looked so amateur. Thank goodness for a fresh set of eyes: my mother-in-law came over to see the problem and suggested handsewing over the seams to tack down the bunching. This made a world of difference!! Apparently I forgot to take an after picture though, so you will just have to take my word for it.  

Next I tried to machine quilt some modern clouds into the sky, but the thread was too skinny to show up properly. So I hand embroidered over it with a chain stitch and 6 strands of thread to make sure it really popped. 
Clouds and the moon
My last step was to hand bind the quilt with the same black as the border. I wanted the border and binding to just blend into the background, so as not to detract from the star of the show, the fabrics from the clothes. 
The finished front


The finished back
Closeup of the moon
Wrapped and ready to gift
Angelique came over yesterday for the big reveal, and I am so happy that she loves it! I shared with her the poem and my inspirations, and she shared with me the meanings that the ocean and the moon and white cotton shirts have for her and her mom. I think part of what makes this memory quilt so special, is that not only is it made with Renee's clothing, it has deeper meaning and significance in addition to beauty. Just like Renee! Angelique is excited to finally have a quilt that she can use and love, to take comfort in and share with her children. And I am so happy that I got to be a part of this project and pay tribute to an amazing woman. This project was a true labour of love, and an honour to be a part of. Renee wrote regularly on her blog Circling My Head, and I encourage everyone to have a read through to get a glimpse of what made her so special.