Another special baby arrived about a month ago, so of course, a special blankie was in order. Logan was born in August, a typically very hot month. So I didn't think this through very well when I decided to make a knit blanket backed with minky. This is a pretty heavy, toasty warm blanket!
 |
| Rainbow Animal Parade blankie for Logan |
I have been wanting to try colour work for a while now, and thought this would be a perfect opportunity to try it out. You can definitely see an improvement of my skills as the blanket progresses. The first few animals are knit a little too tightly, so there is a wrinkle to the blanket. But I don't think Logan will mind!
I chose to use a rainbow of colours, with a different animal for each colour. I started with puppies, because Logan's parents have a dog that they love very much. Also the chart looked pretty easy! Next was kitties because they were on the same chart!
Then rabbits, tree frogs, and lastly, some dark teal whales. I varied the directions the animals faced for visual interest, and well as had different scales of animals; some rows are small and some are tall. I think with the rainbow of colours, the blanket is really cute to look at!
 |
| Rabbits |
 |
| Tree frogs |
 |
| Whales |
I knit this blanket using a steek. For those of you unfamiliar with the term, that means that I knit this in the round, with 3 purl stitches joining the end to the beginning of each row. This made for quick work: I am waaaaay faster at knitting rows than purling. Also, I can't imagine doing the colour work using purl rows....
 |
| You can see the steek in this photo of the complete tube - it is the ghostly line running from top to bottom down the centre |
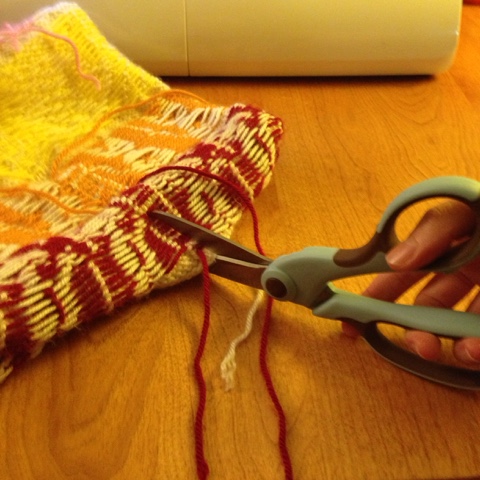
When all the knitting was complete, I sewed down either side of the steek using my sewing machine set at the smallest stitch length and a matching thread, then CUT down the centre between the stitches. With scissors!
 |
| Gulp! Here we go!! |
That was very nervewracking! But it worked! I had a flat blanket instead of a tube, and nothing was unraveling, which I had pictured as the worst-case-scenario. The only problem is, because of my tension issues when first learning the colour work technique, the top half of the blanket was a little wider than the bottom half! So I attempted blocking for the first time.
 |
| It looks pretty darn good blocked! |
I have been knitting for at least 10 years. And I have never blocked anything prior to now. I think this means I am lazy. I just used a big piece of plywood and some tacks to stretch and block the blanket. I used a sponge and a bowl of water, since I didn't have a spray bottle, which resulted in a pretty saturated blanket. I had to leave it outside in the sun to dry for a whole day.
Then I popped it off the board, and started on the border. I went with a basic crochet scallop because that is always a pretty edge for a little girl's blanket. I did a few rows of single crochet around the whole thing to set up the scallops, as well as to seal in the feathery edges from cutting the steek. This way, they were contained inside the crochet stitches.
 |
| Three single crochet rows, then the adorable scalloped border |
My last step to this blanket was to attach a backing. I didn't want to gift a blanket to a baby with all those floats from the colourwork. That is asking for some stuck fingers, or snagged yarns. I had some minky left over from my
Cozy Butterfly Rag Quilt, so I used that as the backing. This was a much tougher task than I thought it would be. Despite the stretchyness of the minky, it just could not keep up with the stretchyness of the knit. So it was a little bunchy and kind of terrible. That's when I hit my "I can never give this as a gift, it's awful!" moment. So I stepped away, and came back to it the next day after doing a little brainstorming. I used my sewing machine to stitch some "quilting" into the blanket. Holding the knit layer stretched tight to the minky, I was able to tack the front to the back and significantly reduce the bunching problem. I wish I would have taken before and after pictures to show you what I mean. Unfortunately, I rarely remember to capture my failures on film.
So after much hoopla with the backing, the blanket was almost complete. It just needed a label! I made a little home-printed custom label using a Heather Ross mouse, and attached it with a blanket stitch. Now this blanket is ready to gift!
 |
| The sweet label |
 |
| The finished (and only slight bunchy) product! |


No comments:
Post a Comment