Thursday, 11 February 2016

The Homemade Nursery: the Essential Antlers

As you may remember from my post about my Nurture Hope quilt, I am quite fortunate to be pregnant.  My husband and I had been holding off on doing much in terms of preparation for the baby until we took holidays back in November.  Then we got started and have been plugging away every since.  I'm going to share individual projects we embarked on over the past few months, and then a final blog post with the big reveal of the whole room. 

The Homemade Nursery: the Essential Antlers

I wanted to create a gallery wall with a mixture of art and other structures in the baby's room.  One thing I wanted to include on the gallery wall was a set of antlers.  Little did I know (what a city girl), antlers are huge!!  

My husband had a set of mounted antlers in his room as a child, and they since moved into his parent's garage.  They are a pretty impressive set (to my eyes, anyway), but they were a little dated looking, because of the red velvet setting they rested on.  They needed an update.
Before
I took all the screws out of the back of the plaque in order to remove the mount and the antlers. The velvet was held in place with staples, so I carefully pulled each one in order to remove the fabric from the mount.  Once that was off, I used it as a pattern for the replacement fabric.  I wanted to find something with a knit texture, preferably with a fair isle pattern..... and I stumbled on the perfect thing in the sock aisle at Superstore!  It took a little cutting and creative sewing to turn the two socks into one piece of usable fabric, but it was worth it.  After cutting it to size, it easily stretched back over the antler mount, and I stapled it into place the same way as the velvet had been.  I reattached the mount to the plaque, and it was ready to hang on the wall!  
After
I decided to re-evaluate the plan to include it in the gallery wall due to the sheer size of the things.  So it took a featured place over the bookshelves instead. 
In situ: among excellent book company
 I was given a little grief about including antlers in a nursery, but I think it works really well!

Wednesday, 10 February 2016

The Homemade Nursery: Baby mittens (Another free knitting pattern!)

As you may remember from my post about my Nurture Hope quilt, I am quite fortunate to be pregnant.  My husband and I had been holding off on doing much in terms of preparation for the baby until we took holidays back in November.  Then we got started and have been plugging away every since.  I'm going to share individual projects we embarked on over the past few months, and then a final blog post with the big reveal of the whole room. 

The Homemade Nursery: Baby mittens (Another free knitting pattern!)

After the success of the Baby hat, I decided to make matching mittens as well, since I had so much yarn left.  These took a lot more trial and error than the hat.  At first, I tried to follow an owl pattern I found on Pinterest, but that went terribly wrong.  There is nothing wrong with the pattern, I'm sure.  It was the choice of colour and yarn that just didn't work.  
That's supposed to be a tiny owl.  They can't all be winners.
So, new plan.  Figuring out a hat pattern went well, so why not a mitten pattern?  Again, it took a couple false starts to figure out how many stitches to cast on to achieve the desired size with this bulky of a yarn and larger needle size, but eventually I figured it out.  If you'd like to make a pair for yourself, here is the pattern! If you make the mittens, leave a comment or tag me on Instagram (@_LT_Smash), I'd love to see it!

Yarn: Bulky (5) Bamboospun in Dark Sky and Seablue. I used way less than a ball of each. 
Needles: Set of 4 double pointed size 10 needles

kfb: knit into front and back of the stitch
ssk: slip two stitches, then knit them together

Cast on 16 stitches using a stretchy cast on (I used the long tail cast on) in your stripe colour. 
Spread the stitches evenly over 3 needles (5, 5, and 6 stitches per needle) and join without twisting to knit in the round.  
Row 1-10: K1P1 across entire row (16 stitches on needles)
Row 11: Switch to main colour.  (kfb, K1, kfb, K2, kfb, K1, kfb) x2 (24 stitches on needles)
Row 12-26: Knit all stitches
Row 27: (K2tog, K10, ssk) x2 (20 stitches on needles)
Row 28: (K2tog, K9, ssk) x2 (16 stitches on needles)
Row 29: (K2tog, K16, ssk) x2 (12 stitches on needles)

Use Kitchener stitch to close off the end of the mittens. Weave in the tail, and any other yarn ends. Make two (obviously!)
Hats and mitts.... oh my!
I think these are really cute newborn mittens, and will hopefully keep our baby's little fingers nice and toasty in the first few (freezing) months of life.  

Tuesday, 9 February 2016

The Homemade Nursery: Baby hat (A free knitting pattern!)

As you may remember from my post about my Nurture Hope quilt, I am quite fortunate to be pregnant.  My husband and I had been holding off on doing much in terms of preparation for the baby until we took holidays back in November.  Then we got started and have been plugging away every since.  I'm going to share individual projects we embarked on over the past few months, and then a final blog post with the big reveal of the whole room. 

The Homemade Nursery: Baby hat (A free knitting pattern!)

I wanted to knit a warm, soft toque and mittens for our baby to wear after birth, because the due date is in February, which is the coldest month around here.

I had the perfect yarn in my stash that I had bought from Hobby Lobby a couple years ago. It is Bamboospun, and it's super soft and luxurious. I had it in two perfectly gender neutral colours, so I did a soft blue stripe along the bottom with the rest in grey. 

If you'd like to make one for yourself, here is the pattern! It took me about 2.5 hours total, but that includes ripping and restarting, and frogging the crown to try again. A little trial and error never hurt anyone! If you make the hat, leave a comment or tag me on Instagram (@_LT_Smash), I'd love to see it!

Yarn: Bulky (5) Bamboospun in Dark Sky and Seablue. I used way less than a ball of each. 
Needles: Set of 4 double pointed size 10 needles

Cast on 36 stitches using a stretchy cast on (I used the long tail cast on) in your stripe colour. 
Spread the stitches evenly over 3 needles (12 stitches per needle) and join without twisting to knit in the round.  
Row 1: knit all stitches
Row 2: K1P1 across entire row
Row 3: P1K1 across entire row
Row 4: Switch to main colour and knit all stitches
Continue knitting all rows until the hat measures 3" from the cast on edge. 
Begin crown:
Row 1: (K4, K2tog) repeat for entire row
Row 2: knit all stitches
Row 3: (K3, K2tog) repeat for entire row
Row 4: knit all stitches
Row 5: (K2, K2tog) repeat for entire row
Row 6: knit all stitches
Row 7: (K1, K2tog) repeat for entire row
Row 8: knit all stitches
Row 9: K2tog across entire row
You should have 2 stitches on each needle, for a total of 6 stitches. Cut the tail of your yarn and using a tapestry needle, draw the tail through all 6 stitches and pull the stitches tight. Weave in the tail, and any other yarn ends. 

This is a great project that takes just a little bit of yarn, so it is a great way to use up scraps of bulky yarn you have in your stash. I'm very happy with the hat, and think it is just perfectly soft and warm for a fresh baby's head.  Up next: matching mittens!

Monday, 8 February 2016

The Homemade Nursery: A special blankie for a special baby

As you may remember from my post about my Nurture Hope quilt, I am quite fortunate to be pregnant.  My husband and I had been holding off on doing much in terms of preparation for the baby until we took holidays back in November.  Then we got started and have been plugging away every since.  I'm going to share individual projects we embarked on over the past few months, and then a final blog post with the big reveal of the whole room. 

The Homemade Nursery: A special blankie for a special baby

I adore making knitted blankies for new babies.  So of course I had to make one for my new baby!!  And I wanted it to be the most special blankie I have ever made.  We don't know the gender of our little chinchilla (birthday surprise!), so I also wanted to keep it pretty neutral.  After much browsing on Pinterest, I found a perfect pattern by Leyla Alieva on Ravelry.  It uses strategic increases and decreases to create a leafy pattern, and it is gorgeous.  
In progress... those leaves!
I selected a bamboo silk yarn because it was so soft and luxurious, without being fluffy.  I wanted something with a smooth strand to really highlight the pattern.  And bonus points for being a natural material.  I often knit with acrylic yarns, but I wanted to splurge and get something real and of good quality this time.  This blanket is knit with two strands at a time, which makes the overall blanket a little heavier with a really nice drape.  
Finished, but not blocked
I increased the overall dimensions of the blanket because I wanted it a little larger than the pattern's size.  I just knit more leaf repeats across for more width, and a couple extra row repeats for more length.  It was an easy pattern to customize this way.  The finished blanket is just wonderful.  After some gentle blocking, the leaves and the spaces between them have such good dimesion, and the yarn held up well and is still so soft and has a nice lustre to it.  
After blocking.... so much definition between leaves.... it really is a special blankie.
The blanket fits perfectly with the rest of the nursery decor, and will hopefully be a favourite for years to come for our little one.  

Sunday, 7 February 2016

The Homemade Nursery: One-of-a-kind Diaper Bag

As you may remember from my post about my Nurture Hope quilt, I am quite fortunate to be pregnant.  My husband and I had been holding off on doing much in terms of preparation for the baby until we took holidays back in November.  Then we got started and have been plugging away every since.  I'm going to share individual projects we embarked on over the past few months, and then a final blog post with the big reveal of the whole room.  

The Homemade Nursery: One-of-a-kind Diaper Bag

As a general rule, I am not a fan of diaper bags.  I find that they all look the same, and are never very attractive, even the ones that are supposed to be trendy or modern.  I decided to try my hand at making a diaper bag, as I have more than enough fabric building up in my stash to put together something I would find appealing.  

I started with this Hello, Bear print, and built the rest of the bag around it.  

I had some leftover Essex linen from another project, and a gorgeous orangey woodgrain to use for the lining.  
Supplies gathered - the arrows didn't end up getting used
I decided on the Supertote pattern by Noodlehead, and it was absolutely fabulous.  The instructions are so clearly written, and I learned a few new techniques entirely from the pattern.  I often find patterns include instructions that require further googling to understand fully, but not this one.  You can't go wrong with it.  I am super impressed with myself for executing such a professional looking bag, and honestly it is thanks to the fantastic pattern.  
The front, with piping and a magnetic snap pocket
The back, with quilt-as-you-go panel
The bag itself is really nice.  It has a magnetic snap front pocket, and two elasticized pockets on the inside.  It is fully lined, quite roomy, and very sturdy.  I used a quilt-as-you-go method to make the front pocket and back panel to give it a little more pizzaz, and I am happy with how it turned out.  
The inside stocked with a few supplies.  Also featured: inset zipper!
I included a little "handmade" tag, because I like to brag celebrate a homemade creation. 
Homemade anything is better than store bought everything.
I am pretty excited to put this bag into use! Baby can get here anytime, as the bag is packed and ready to head to the hospital.  

Friday, 5 February 2016

The Homemade Nursery: A Custom Dresser Remodel

As you may remember from my post about my Nurture Hope quilt, I am quite fortunate to be pregnant.  My husband and I had been holding off on doing much in terms of preparation for the baby until we took holidays back in November.  Then we got started and have been plugging away every since.  I'm going to share individual projects we embarked on over the past few months, and then a final blog post with the big reveal of the whole room.  


The Homemade Nursery: A Custom Dresser Remodel

One of the first things I knew I was going to want to do for the baby's room was refinish a dresser.  I find that most dressers bought brand new these days are kinda..... hunks of garbage.  They are wood printed veneer pasted over junky particle board, and fall apart at nothing, all the while not even looking nice.  And they want $300 for them!  I wanted something with holding power, something strong and real, something worth the money.  

So I took a tour of the local thrift shops and used furniture stores, hoping to find something made of real wood, in a vintage style that could handle some modernizing.  I was super lucky to find this mid-century modern dresser, in good condition, just asking for some love.  
I feel like I stole this beauty.... it was only $75!
So I took it home, and sanded all the varnish off using my fancy new power sander (because doing this by hand would have killed me).  
Sanded and ready for staining
Once it was down to bare wood, my husband took over and stained the frame of the dresser a nice walnut colour, and sealed it with a clear coat finish to make it all shiny and nice.  I painted the drawers white, and then we sprayed shellac on all the unexposed surfaces to seal in the slightly musty smell the dresser had acquired over the years.  

Next, we attached the hardware.  I found the most perfect brass animal heads for the top two smaller drawers at Anthropologie (and spent almost as much as the dresser itself on them!). 


For the four larger bottom drawers, we spray painted the original hardware with a brass paint to match the pulls.  
Almost perfect!
I am so proud of how this dresser turned out! 
The final product

Close up
It is definitely a classic example of not knowing how to do something, googling it to learn, and executing it well.  I encourage anyone thinking of giving an old piece of furniture a makeover to give it a try.  We didn't find any aspect of the project difficult, and the results are so worth the effort.  

This dresser is the perfect addition to our baby's Homemade Nursery!

Wednesday, 16 September 2015

Rainbow animal parade : a blanket for Logan

Another special baby arrived about a month ago, so of course, a special blankie was in order.  Logan was born in August, a typically very hot month.  So I didn't think this through very well when I decided to make a knit blanket backed with minky.  This is a pretty heavy, toasty warm blanket!
Rainbow Animal Parade blankie for Logan
I have been wanting to try colour work for a while now, and thought this would be a perfect opportunity to try it out.  You can definitely see an improvement of my skills as the blanket progresses.  The first few animals are knit a little too tightly, so there is a wrinkle to the blanket.  But I don't think Logan will mind!

I chose to use a rainbow of colours, with a different animal for each colour.  I started with puppies, because Logan's parents have a dog that they love very much.  Also the chart looked pretty easy!  Next was kitties because they were on the same chart!
Puppies (this was my first attempt at colourwork.... and it shows! So many gaps and overstretched stitches)
Kittens (getting better!)
After my first two charts, I decided to get adventurous and tackle a more complicated hedgehog chart.  Unfortunately, the yellow yarn I have doesn't really show up great against the background, so the details are a little washed out.  So moving forward, I selected more basic charts, so that the picture really popped.
Hedgehog
Squirrel couples, an elephant family, and a row of penguins followed, which all turned out pretty nicely.
Squirrel couples
Elephant family
Penguins
Then rabbits, tree frogs, and lastly, some dark teal whales.  I varied the directions the animals faced for visual interest, and well as had different scales of animals; some rows are small and some are tall. I think with the rainbow of colours, the blanket is really cute to look at! 
Rabbits
Tree frogs
Whales
I knit this blanket using a steek.  For those of you unfamiliar with the term, that means that I knit this in the round, with 3 purl stitches joining the end to the beginning of each row.  This made for quick work: I am waaaaay faster at knitting rows than purling. Also, I can't imagine doing the colour work using purl rows....
You can see the steek in this photo of the complete tube - it is the ghostly line running from top to bottom down the centre 
When all the knitting was complete, I sewed down either side of the steek using my sewing machine set at the smallest stitch length and a matching thread, then CUT down the centre between the stitches.  With scissors! 
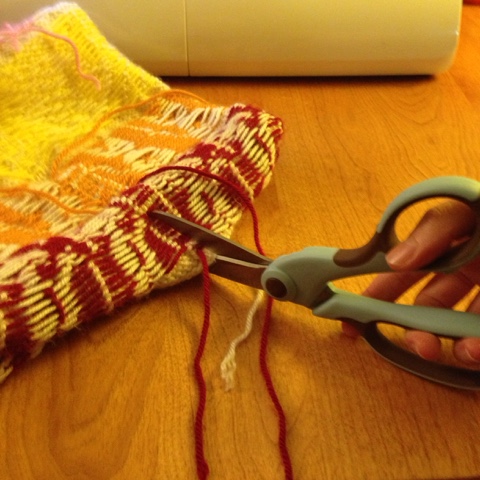
Gulp! Here we go!!
That was very nervewracking!  But it worked!  I had a flat blanket instead of a tube, and nothing was unraveling, which I had pictured as the worst-case-scenario.  The only problem is, because of my tension issues when first learning the colour work technique, the top half of the blanket was a little wider than the bottom half!  So I attempted blocking for the first time.
It looks pretty darn good blocked!
I have been knitting for at least 10 years.  And I have never blocked anything prior to now.  I think this means I am lazy.  I just used a big piece of plywood and some tacks to stretch and block the blanket.  I used a sponge and a bowl of water, since I didn't have a spray bottle, which resulted in a pretty saturated blanket.  I had to leave it outside in the sun to dry for  a whole day.  

Then I popped it off the board, and started on the border.  I went with a basic crochet scallop because that is always a pretty edge for a little girl's blanket.  I did a few rows of single crochet around the whole thing to set up the scallops, as well as to seal in the feathery edges from cutting the steek.  This way, they were contained inside the crochet stitches.
Three single crochet rows, then the adorable scalloped border
My last step to this blanket was to attach a backing.  I didn't want to gift a blanket to a baby with all those floats from the colourwork.  That is asking for some stuck fingers, or snagged yarns.  I had some minky left over from my Cozy Butterfly Rag Quilt, so I used that as the backing.  This was a much tougher task than I thought it would be.  Despite the stretchyness of the minky, it just could not keep up with the stretchyness of the knit.  So it was a little bunchy and kind of terrible.  That's when I hit my "I can never give this as a gift, it's awful!" moment.  So I stepped away, and came back to it the next day after doing a little brainstorming.  I used my sewing machine to stitch some "quilting" into the blanket.  Holding the knit layer stretched tight to the minky, I was able to tack the front to the back and significantly reduce the bunching problem.  I wish I would have taken before and after pictures to show you what I mean.  Unfortunately, I rarely remember to capture my failures on film.

So after much hoopla with the backing, the blanket was almost complete.  It just needed a label!  I made a little home-printed custom label using a Heather Ross mouse, and attached it with a blanket stitch.  Now this blanket is ready to gift!
The sweet label
The finished (and only slight bunchy) product!