Wednesday, 16 September 2015

Rainbow animal parade : a blanket for Logan

Another special baby arrived about a month ago, so of course, a special blankie was in order.  Logan was born in August, a typically very hot month.  So I didn't think this through very well when I decided to make a knit blanket backed with minky.  This is a pretty heavy, toasty warm blanket!
Rainbow Animal Parade blankie for Logan
I have been wanting to try colour work for a while now, and thought this would be a perfect opportunity to try it out.  You can definitely see an improvement of my skills as the blanket progresses.  The first few animals are knit a little too tightly, so there is a wrinkle to the blanket.  But I don't think Logan will mind!

I chose to use a rainbow of colours, with a different animal for each colour.  I started with puppies, because Logan's parents have a dog that they love very much.  Also the chart looked pretty easy!  Next was kitties because they were on the same chart!
Puppies (this was my first attempt at colourwork.... and it shows! So many gaps and overstretched stitches)
Kittens (getting better!)
After my first two charts, I decided to get adventurous and tackle a more complicated hedgehog chart.  Unfortunately, the yellow yarn I have doesn't really show up great against the background, so the details are a little washed out.  So moving forward, I selected more basic charts, so that the picture really popped.
Hedgehog
Squirrel couples, an elephant family, and a row of penguins followed, which all turned out pretty nicely.
Squirrel couples
Elephant family
Penguins
Then rabbits, tree frogs, and lastly, some dark teal whales.  I varied the directions the animals faced for visual interest, and well as had different scales of animals; some rows are small and some are tall. I think with the rainbow of colours, the blanket is really cute to look at! 
Rabbits
Tree frogs
Whales
I knit this blanket using a steek.  For those of you unfamiliar with the term, that means that I knit this in the round, with 3 purl stitches joining the end to the beginning of each row.  This made for quick work: I am waaaaay faster at knitting rows than purling. Also, I can't imagine doing the colour work using purl rows....
You can see the steek in this photo of the complete tube - it is the ghostly line running from top to bottom down the centre 
When all the knitting was complete, I sewed down either side of the steek using my sewing machine set at the smallest stitch length and a matching thread, then CUT down the centre between the stitches.  With scissors! 
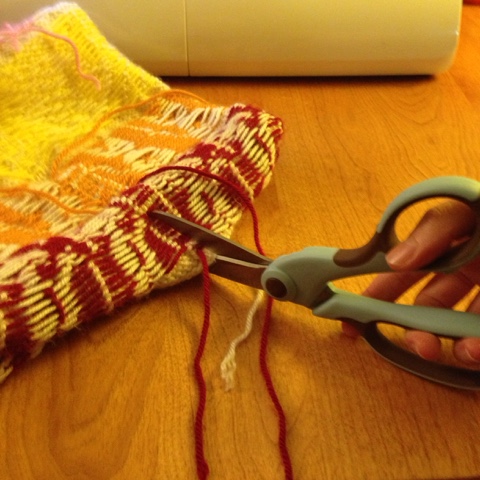
Gulp! Here we go!!
That was very nervewracking!  But it worked!  I had a flat blanket instead of a tube, and nothing was unraveling, which I had pictured as the worst-case-scenario.  The only problem is, because of my tension issues when first learning the colour work technique, the top half of the blanket was a little wider than the bottom half!  So I attempted blocking for the first time.
It looks pretty darn good blocked!
I have been knitting for at least 10 years.  And I have never blocked anything prior to now.  I think this means I am lazy.  I just used a big piece of plywood and some tacks to stretch and block the blanket.  I used a sponge and a bowl of water, since I didn't have a spray bottle, which resulted in a pretty saturated blanket.  I had to leave it outside in the sun to dry for  a whole day.  

Then I popped it off the board, and started on the border.  I went with a basic crochet scallop because that is always a pretty edge for a little girl's blanket.  I did a few rows of single crochet around the whole thing to set up the scallops, as well as to seal in the feathery edges from cutting the steek.  This way, they were contained inside the crochet stitches.
Three single crochet rows, then the adorable scalloped border
My last step to this blanket was to attach a backing.  I didn't want to gift a blanket to a baby with all those floats from the colourwork.  That is asking for some stuck fingers, or snagged yarns.  I had some minky left over from my Cozy Butterfly Rag Quilt, so I used that as the backing.  This was a much tougher task than I thought it would be.  Despite the stretchyness of the minky, it just could not keep up with the stretchyness of the knit.  So it was a little bunchy and kind of terrible.  That's when I hit my "I can never give this as a gift, it's awful!" moment.  So I stepped away, and came back to it the next day after doing a little brainstorming.  I used my sewing machine to stitch some "quilting" into the blanket.  Holding the knit layer stretched tight to the minky, I was able to tack the front to the back and significantly reduce the bunching problem.  I wish I would have taken before and after pictures to show you what I mean.  Unfortunately, I rarely remember to capture my failures on film.

So after much hoopla with the backing, the blanket was almost complete.  It just needed a label!  I made a little home-printed custom label using a Heather Ross mouse, and attached it with a blanket stitch.  Now this blanket is ready to gift!
The sweet label
The finished (and only slight bunchy) product!


Wednesday, 19 August 2015

Nurture Hope: an infertility story

After I had surgery almost a year ago, I was very hopeful that my husband and my dream of having a family would quickly become a reality. I followed up with our fertility clinic a few weeks into my recovery, and I was given a prescription for fertility medications to help us along that path. Unfortunately, when I went back in for routine monitoring a month later, my doctor found that the endometrioma (a cyst caused by endometriosis) on my left ovary that had been removed along with part of my bowel, had returned and completely taken it over. That means that, despite having just had surgery, my endometriosis was back and doing significant damage to my reproductive organs. At this point, my doctor recommended that we take advantage of the very small and honestly, a little unlikely window of opportunity we have after surgery, and attempt an IVF cycle. 

This was a scary thing for me to hear. I have never been keen on the IVF process, and the low chances, made even lower by my medical status, make the investment of emotions, physical pain/discomfort, and finances all the more of a risk. But we really want a family, and if this was the only way, then so be it. 

When I got the call that our name had come up on the waiting list to start a cycle, it was a few months sooner than I had thought it would be. So of course we jumped on it, and started the long and intensive process of oral hormone medications, injectables, almost daily blood and ultrasound monitoring, scary medical procedures, progesterone suppositories, and emotional turmoil. 
I made a beautiful hour basket to hold all my injection supplies- the process wouldn't be pretty, but gosh darn it, the needles can be kept somewhere pretty!
To help me cope with the emotional side of this process, I decided to make a special quilt to give me comfort at the end of this, regardless of the outcome. I wanted something cozy, with my hopes and dreams and pain sewn right into it, and significance in every stitch. 


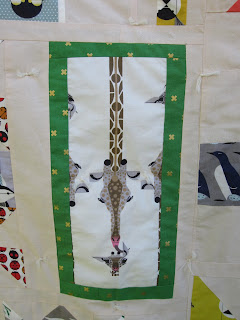
So of course, I called my fave Charley Harper into action. His most recently released line was called Nurture, and it features mama animals with their babies. It was meant to be! And the name of the line fit perfectly with my meditation, and eventual theme for the quilt - Nurture Hope. Because above all, hope and faith are the most important things in this long and hard journey. And Hope doesn't necessarily come easily. You have to keep it tucked away in your heart, and feed it happy thoughts (which are sometimes hard to come by when dealing with infertility), and stroke it when it is feeling small and scared. And you have to do this even when The Facts are screaming at you that your hope is unreasonable and unlikely. You have to Nurture Hope. And this quilt helped me do that. 


I decided to make a sampler style quilt, so that each print with their different scales could be properly featured in an individual block of their own. First I spelled out the words Nurture Hope. Sometimes you need a constant reminder of your task before you, to help you stay on track. Having these words up on my design wall for a few months was very helpful indeed. Next, I made the large blocks, using a different print for the centre of each block. I didn't have a plan at all in terms of where the quilt was heading, so lastly, I made small blocks, and the ones with funny shapes to fill in the spaces between blocks in the layout. This was a very fun part, changing and rearranging until the final product was just right. And sometimes, initial thoughts and intentions changed or modified into something better. 


I have many parts of this quilt that have special meaning to me, and here I will share them:

Above all, the message is so important to me.  Nurture Hope.
Infertility is filled with ups and downs.  I try to maintain more ups, but sometimes you fall into a pit of despair.  Especially when your period arrives despite all your hopes otherwise.  Hence the red arrow is the down arrow.  
This little piece of artwork is called Family Owlbum.  That is just so special, and one of my favourites from the collection.
These penguins pretty much sum up living with infertility.  All around you, everyone has their egg, but you are alone in thinking "Where's my egg?"  Everyone has their eyes up and focused on other things, but the mamas without their eggs have their eyes focused squarely on where their eggs should be.  Rarely are your thoughts diverted otherwise.  My heart aches for the penguins without their eggs.  
Sometimes you have a million thoughts in your head during the IVF process.  What if I'm doing the injections wrong?  Is this feeling normal?  Does this pain mean it isn't working?  Will this work?  Of course it will work.  It's impossible that it will work.  What happens to me if it doesn't work?  It's not fair.  Fear, anxiety, glimmers of hope.  You must Be Still.  Have faith.  Nurture Hope.
The feathers represent for me that, as with fabric scraps that you can piece together to make something whole, so it is with life.  Sometimes you don't have the whole image to be able to have the perfect picture of life.  But you can still make a good life with what you have.  
This artwork is called Love from Above.  I truly feel that love is greater than all of us, and God's role in my journey has been integral.  Faith and hope can be hard to come by, but that constant love from above can keep you going when things seem bleak.  
And ultimately, love conquers all.  

For me, this process has been such a metaphor for this journey. You start with the major plot points planned out in your head, and then you have to fill in the middle with unexpected and unplanned aspects, all the while rearranging, adapting, and persevering through, even when you don't know how it's going to turn out in the end, fearing that it will all be a terrible mess, and all the while remembering to Nurture Hope. 


And finally, after all the waiting and all the work, and all the anxiety, you have a happy ending. A beautiful quilt, and a beautiful pregnancy. I am so happy to report that our journey has a happy ending. Against many odds, our hoping and wishing and praying has been for a baby to call our own, and now we have that chance. Oh happy day! 


Tuesday, 7 July 2015

The Small World Mini quilt: pattern tested

When I saw the Small World mini quilt that Leasa of ProjectLeasa (@projectleasa on Instagram) made for her partner in the #disneyquiltswap2015, I instantly swooned. 
Leasa's original mini quilt, courtesy of her @projectleasa Instagram
The whole concept is adorable, the bright colours are so eye catching, and I had recently been to Disneyland and loved every minute of it - including the Small World ride. 
It's a Small World ride Disneyland,  Christmas 2014
Small World all lit up at night
So when Leasa decided to write the pattern for it, I followed along closely, so exited for it to be release so I could make my very own. Lucky for me, she put out a call for pattern testers, and I was one of the six quilters she selected to help her to make sure the pattern works as written, and edit anything that may need reworking. 

Leasa wrote an excellent pattern that needed very little in the way of correction! It is very well written, the explanations are so clear, and there is the added bonus of step-by-step photos for literally every step! This is such a fun pattern to make; it is a traditional piecing pattern that includes half square triangles, curves, buttons, and embroidery. And although the pattern is labeled Intermediate Skill Level, the instructions are so clear, a confident beginner could tackle this project and be happy with their results. 

So, with no further ado, here is my completed The Small World Mini quilt top!


The pattern is now available at the PieceOLease etsy shop!

Thursday, 2 July 2015

Cotton + Steel Mini Quilt Swap: Pt 2: Outgoing

I had so much fun with the Cotton + Steel Mini Quilt Swap.  


It was the perfect excuse to sign up for the monthly Cotton + Steel Club over at Pink Castle Fabrics . This club is the best for building a stash of C+S without having to specifically choose what you want.  Which can be hard to do when you want everything!  After a few months, I had everything I needed and more to put together a mini quilt and extras for this swap.

My assigned partner said that she likes minimalist quilts made with paper piecing, loaded with amazing machine quilting.  Huh.  I can definitely rock the paper piecing, and I like minimalist quilts too, so that is no problem.  But I was very nervous about how I should quilt the thing.  My free motion skills are beginner at best.  I have dabbled in stipples and vines with leaves before, but nothing close to "amazing machine quilting."  But, inexperience has never stopped me before.  I am a first believer in just trying.  You never know how you might surprise yourself!

Completed quilt top
I chose a meandering geese pattern I spotted on Pinterest, some Essex linen, and a variety of C+S prints to make the top.  Then I spent the next couple weeks practicing graffiti doodling with pen and paper.  

My first attempt
This way I had some ideas of what kind of motifs worked well together, what filler designs I could use in between larger designs, and a general idea of placement within the quilt.  After making a quilt sandwich with a black backing to show off the quilting, I set to work.

First, I quilted triangle spirals inside the geese.  I decided to use the spool of Glow-in-the-Dark thread I have been hoarding.  Just in case the quilting was terrible, at least I had some special effects to fall back on!  Then I started the graffiti quilting.  My practice doodles definitely helped.  I ended up adding in other things as I went, and tried fancier designs as my confidence grew.  I wouldn't say the quilting is perfect, but I think I gave it a good try and am happy with the results!

Not too bad for my first time!
I designed a quilt label to look like a postcard, complete with a C+S stamp from one of the fabric prints, and bound it with a colourful print from the August line.  I prefer hand binding to machine binding, but up until this quilt, I have never been happy with my corners.  This quilt I really feel like I got those corners perfect!  It was a proud moment for me.

Look at those mitred corners in the binding!

All done and ready to send
After completing the quilt, I made a few extras to send along.  First, using another paper piecing pattern I found on Pinterest, I made a couple mix tape blocks, using C+S selvedge as the label to turn into a zippy pouch.  I think the little Hot Cross buns make the perfect wheels!  I stuffed the pouch with a notebook and pen, and some quilty washi tape.
Front and back of the pouch
I also made a needlebook (my fave quick project!) with mostly coral fabrics, and a pop of mustard inside.  And I finally got some wool felt from Modern Textiles when I was in Fargo last April, so I used some of the good stuff for the pages.  I also made a needleminder from the bunny fabric from the Mochi line.

I always love a needlebook
I rounded out the package with some lotion and lipgloss (always essential), some Canadian contraband treats (Coffee Crisp, Smarties, and the illegal-in-the-US Kinder Egg!), and a Berenstain Bears book called God Bless Our Home, as my partner just recently moved to a new house!

Rolled up for shipping
I had a great time putting together this package, and loved getting to know my partner through her photos.  It's always nice to make a new friend, and what better way than by sending a fun present?!

If you want to see what I received in this swap, see Cotton +Steel Mini Quilt Swap: Pt 1: Incoming