Friday, 22 May 2015

Blogger's Quilt Festival Entry: Family Owlbum

I decided to enter my Family Owlbum mini quilt in the Amy's Creative Side Blogger's Quilt Festival in the mini category.
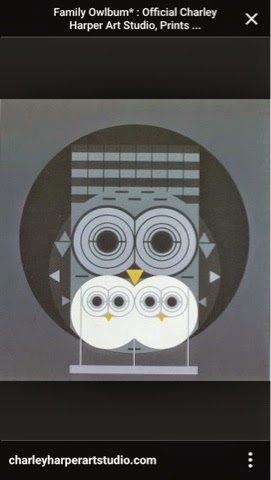
I recently participated in a Charley Harper themed swap on Instagram. My assigned partner said that she loved Family Owlbum, so I decided to recreate the piece as a mini quilt.

The original artwork by Charley Harper
Here are some photos of my work.  If you want to read more about this project, please check out this post!  Please enjoy, and vote for my quilt if you like it!
My interpretation (the front)
The quilt label (a Charley Harper nest)
The back after quilting
Close up of Family Owlbum
Close up of feathers
Closeup of machine binding
Thank you for reading! To vote, find my mini quilt in the Mini Category and click on the heart in the corner of the picture. It's that easy! 

Thursday, 14 May 2015

The Homemade Heart's Guide to English Paper Piecing

I've had some questions about how I make the La Passacaglia rosettes, so I decided to put together a quick tutorial. First of all, I want to assure you that You Can Do It!

English Paper Piecing (or EPP) is very easy, and very accessible, as you don't need any fancy or expensive tools. I will show you what I use, but even that isn't a hard and fast rule, it's just what I have become comfortable with. Adapt and use whatever makes you happy.

The pattern for the La Passacaglia quilt is found in the book Millefiori Quilts by Willyne Hammerstein. 
My well-loved book, and my templates page

My copy came from PaperPieces.com. They also sell the little paper pieces to make the quilt, but you can cut them yourself. That's what I did. I photocopied the template included in the book many times and cut them all out to fit as many as I could on a single page of card stock. Then I cut out all the pieces. Easy peasy. You need many more of the "E" triangles than are in the template, so I used the scraps of the card stock to cut extras. 

These are all the supplies I could possibly use to make rosettes. 
The supplies
1: A carrying case to hold all supplies.
2: A needlebook filled with needles. I like to use "betweens" because I find them to be thin, sharp, and decently sturdy. Also, the eye isn't very large, so it passes through the fabric without making a huge hole. 
3: A Sharpie pen to aid in fussy cutting (see the link at #12 for more info).
4: A small rotary cutter for cutting fabric. Or a large one. Or use scissors. 
5: A glue stick for glue basting. I use good old Elmers. 
6: A compact mirror to aid in fussy cutting. This tutorial helped me immensely!
7: A seam ripper. Because sometimes even the best of us make mistakes and have to rip stitches. 
8: Embroidery scissors for cutting threads. 
9: Thread for sewing. I like Gutermann hand quilting thread because it is so smooth. I chose a light grey that kinda just goes with everything, that way I don't have to constantly be changing thread colours. 
10: Wonderclips make your job so much easier when holding pieces together for sewing. They are strong and small, so they don't get in your way. 
11: Paper pieces. Like I said, you may buy them online, or just cut them yourself from card stock. The ones online are "laser cut" which makes them more accurate than handcut pieces, but I don't find that it makes a difference. I guess it just depends if your time printing and cutting tiny pieces is worth more than just buying a set. You can reuse pieces as well. Once a piece is sewn in on all sides, the paper can be removed. Don't worry about the glue, the fabric peels right off easily. 
12: Fussy cutting templates. I made my own (see this tutorial to DIY your own set). You can buy these online as well, and they are fancy acrylic ones. But I couldn't justify the price, personally. 
13: Fabric scissors. See #4 above. 
14: A needle minder and elastic band. I constantly misplace my needle, so a magnetic needleminder is very helpful to keep it readily available. The rubber band helps when you just put on hand lotion, or your hands are sweaty, and you just can't get a good grip on that needle! Use it as a grip assistant. It will help save your nails too (I find mine get all ragged when I am trying desperately to grab hold of a slippery or tightly jammed needle). 
15: Fabric, to make all your beautiful pieces! 
16: Self-healing cutting mat to use with your rotary cutter. No scratching up your tabletops, and it preserves the life of your blade, too. 

Like I said before, this isn't a hard and fast list. You may scoff at some of my items as frivolous and unnessesary, or you may be outraged that something is missing from my list. Use what you are comfortable with. 

Now that our supplies are all assembled, let's talk about making pieces. 

Your first step is to use those fussy cutting templates and a sharpie pen to locate and cut the pieces from your fabric using your rotary cutter and cutting mat, or scissors. Next, centre and glue down the paper piece onto the wrong side of your fabric. Then, run a thin strip of glue down each side and fold over your fabric edges. This is called glue basting. You can also thread baste (which I used to do), but I find glue basting is much faster. 

Now you are ready to sew. 

Place your pieces right sides together with the wonderclip on the side you will be sewing. Make sure your edges are lined up! I like to thread my needle with one strand folded in half, with the two tail ends through the eye of the needle. 
The Whip Stitch
Then I poke the needle through the right hand corner of the pieces (picture 1), draw it through, then pass the needle through the loop at the end of the thread (picture 2). This way the thread is locked without having to tie knots. Then I move over about an 1/8th of an inch, and poke my needle through again, always from the bottom to the top (picture 3). Keep doing this same stitch, bottom to top 1/8th of an inch apart along the whole edge (picture 4). This is called whip stitch. You want your stitches to be as uniform as you can make them, and try not to poke through the papers. Your are hugging the edge with your stitches. 

When you get to the last few stitches, you want to lock off your thread.

Poke your needle through as usual, but bring the needle back through the loop of the thread where it is entering the piece (picture 1). This secures the thread without tying any knots. Do this for the last 2-3 stitches. When you get to the end, bury your thread in the back of the piece by passing the needle under the seam allowance (picture 2). Make sure you don't go through the paper, or the front of the piece! Trim the thread. Open up your pieces and admire your handiwork (picture 3)! 

I like to go round by round when making my rosettes. I first cut and glue baste all my pieces, then sew them together according to the pattern. Once the round is complete, I attach it to the rest of the rosette, going piece by piece until it is all sewn in. 

This is a super fun project, and I am sure that anyone could do it if they so desired. As you can see, it isn't very difficult, and it doesn't require expensive, elaborate tools. It does take time though. Don't expect to whip through this quilt in a week! This is the kind of project where you savour each step and each stitch. 
My current WIP rosette

If you want to read more about this project, head here for the complete index!
The Homemade Heart's La Passacaglia Quilt Index


I decided to make a post that indexes any new updates on my La Passacaglia Quilt.  This is such a large and time consuming project, I anticipate it being a work in progress for quite some time! Thanks for following along, it means the world to me to hear all your positive praise and encouragement.  And if I can inspire even one person to give this project a go, it makes it all the more special to me.  Happy sewing!

2015 Project of the Year: La Passacaglia Quilt

DIY Fussy Cutting Templates Tutorial

First Rosette: 2015 Project of the Year

2015 Project of the Year: May update

The Homemade Heart's Guide to English Paper Piecing


Wednesday, 13 May 2015

2015 Project of the Year: May update

This La Passacaglia quilt is certainly a very slow task. It very well may turn into a 5 year project! Since starting in January, I have managed to complete my first rosette, start a second with some cotton and steel lions, and made good progress on a Charley Harper themed large rosette. I still have two more rounds to go on the big one before it is complete.
A stack of beauties!
It is quite easy to start a rosette. The centre star and the first ring of pentagons goes quickly and is lots of fun. Then that first row of stars hits, and they are small and a little tedious, and definitely time consuming. And as it gets bigger, the more pieces it takes to complete the round!
This part is easy (and fairly quick)
This becomes much more time consuming!
Thankfully, I am not going for speed with this quilt. I am truly enjoying the process. I love interacting with and choosing the fabrics for each round, and fussy cutting each piece. I love seeing how each cog evolves from the starting idea. And I love handsewing each tiny piece. This is a project that, even if it takes me ten years to complete, will be a beautiful keepsake full of memories and deep connections with the fabrics, the events in my life that coincide with each rosette, and the quilting community on Instagram that has been so supportive and loving along the way.  
In total: 3(ish)!

To read more about this quilt so far, check out these related posts: 

First Rosette: 2015 Project of the Year

DIY Fussy Cutting Template Tutorial

The Homemade Heart La Passacaglia Quilt Index


And the one that started it all: Project of the Year: La Passacaglia

Thursday, 7 May 2015

The Alphabetical Laura: Cats

I love cats. I have one cat, his name is Annyong. 

I have had him since he was a kitten, and he has been annoying me ever since! He is such a bad cat. He gets on the counters and eats any food left there. If the food is a loaf of bread, he will tear the plastic open and nibble from the top of every single slice, ruining the whole loaf. If the food is in a container, that won't stop him. He will knock it down, break it open, and liberate the delicious treat inside. He will eat bacon grease left to cool. He will lick the pots and pans on the stove. He is a hungry cat. 

Annyong is a cat that doesn't necessarily like toys, but he does love chasing imaginary things all over the house like a madman. And he likes to torment the dog. Those two havent really figured out how to play together. Mostly, Annyong smacks and bites Bronson, and Bronson states at him with an offended expression. 


Annyong loves boxes and being locked in cupboards. Every time I open the pantry or linen closet, I have to drag him out of there. He will hear the door open and wake up from a dead sleep on a different floor of the house and come running. He finds closed doors to be an insult. 


And every box that enters our home, this cat will attempt to fit into. 

But as much as he is a pain in the neck, I love my sweet kitty so much! 

Other Posts in this series:
The Alphabetical Laura: Animals
The Alphabetical Laura: Books

Tuesday, 21 April 2015

Charley Harper Swap pt 2: Outgoing

The #charleyharpersewnstudio swap wrapped up at the beginning of April. My partner finally got the package yesterday (it took 3 weeks to get from Winnipeg to Tennessee - ridiculous!) My partner said that her favourite prints are Foxsimilies, Family owlbum, and Mice Invasion. So I incorporated all of them into the package I sent.
A Charley Harper label to hint at what's inside!
First, the mini quilt. I waffled back and forth about what I wanted to do, until inspiration hit in the shower (where I do all my best thinking). I decided to recreate Family Owlbum as the main feature of the quilt. 
The original artwork

The owls were pretty challenging. I combined a few different techniques to achieve the final project. I used English Paper Piecing to make the large eyes and the baby owls. I used machine and hand applique to attach all the small parts, and embroidery to draw around the eyes. 
The owl family
I used needle turn applique to attach the portrait to the centre of a cream panel, and added four circles of the feathers fabric around the owls. Then I framed the whole thing using the twigs fabric as the corners. 
The front, before quilting
On the back, I attached a label made to look like a Charley Harper nest. 
This is my favourtie label ever
I wanted to make the circles really pop, so I left them unquilted, and did some free motion stiples around them on the cream fabric. And I did straight line quilting in the frame. I attempted machine binding for the first time for this project, because I wanted to try using a decorative stitch on the binding.  I prefer hand binding.  Maybe I'm just not very good at machine binding, but I wasn't thrilled with how it turned out.  
After quilting
Free motion stiples
Binding closeup
Love the pop!
In hindsight, I wish I would have centred the quilt label on the back to coincide with the owl on the front. It ended up half in and half out of the stiples, which I think is less than ideal. 
The back, post quilting
I made a few extras to include with the mini quilt. I made a needle book featuring Foxsimilies during my stay at 52 Quilters.
Those elephants were perfect for the inside!
I made a needleminder from the ladybug fabric.

And I made a pincushion/jar from the Mice Invasion fabric.
Jar and button courtesy of Grandma's hoarding!
I loved putting this package together for my partner. I enjoy Charley Harper's artwork so much, so it was a lot of fun to get to interact with it like this. Thanks Sewn Studio for hosting this super fun swap!

If you liked this post, you may be interested to see what I received in this swap!

Charley Harper Swap pt1: Incoming

And if you love reading about my love for Charley Harper, here's a few other gems for you.

Feelin' Good on a Wednesday: Charley Harper Love!

The Charley Harper Conundrum

The Charley Harper Resolution

Saturday, 11 April 2015

Charley Harper Swap pt 1: Incoming

The #charleyharpersewnstudio swap wrapped up on the first of the month, and I received my parcel this week!
Eeee! Happy mail day!
I was blown away by the beauty of the mini quilt I found inside. 
The front
I love way she laid out the giraffe
And the fantastic hand quilting!
And these amazing cross stitched birds!!
The back
The label
The full package
She also included a few extras for me! She made a beautiful pin cushion and scissor fob, and she painted a magnet for me with one of the quotes I used for #wordsofwisdomwith52q during my stay at 52 Quilters. Her calligraphy is just gorgeous!
So beautiful!
She also sent some chocolates, which lasted a hot minute. So delicious. 

This package was such a delight to receive, and I am so happy that I participated in this swap. I've said it before (and I'm sure I'll say it again), I love Charley Harper!!