Tuesday, 7 July 2015

The Small World Mini quilt: pattern tested

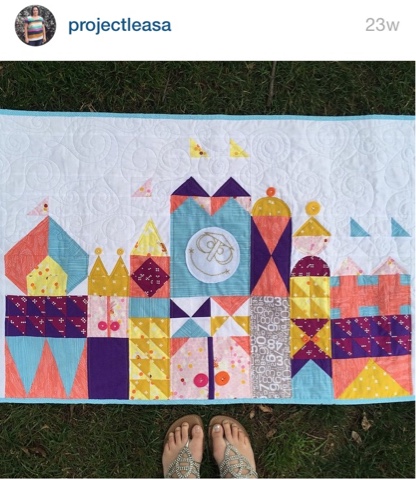
When I saw the Small World mini quilt that Leasa of ProjectLeasa (@projectleasa on Instagram) made for her partner in the #disneyquiltswap2015, I instantly swooned. 
Leasa's original mini quilt, courtesy of her @projectleasa Instagram
The whole concept is adorable, the bright colours are so eye catching, and I had recently been to Disneyland and loved every minute of it - including the Small World ride. 
It's a Small World ride Disneyland,  Christmas 2014
Small World all lit up at night
So when Leasa decided to write the pattern for it, I followed along closely, so exited for it to be release so I could make my very own. Lucky for me, she put out a call for pattern testers, and I was one of the six quilters she selected to help her to make sure the pattern works as written, and edit anything that may need reworking. 

Leasa wrote an excellent pattern that needed very little in the way of correction! It is very well written, the explanations are so clear, and there is the added bonus of step-by-step photos for literally every step! This is such a fun pattern to make; it is a traditional piecing pattern that includes half square triangles, curves, buttons, and embroidery. And although the pattern is labeled Intermediate Skill Level, the instructions are so clear, a confident beginner could tackle this project and be happy with their results. 

So, with no further ado, here is my completed The Small World Mini quilt top!


The pattern is now available at the PieceOLease etsy shop!

Thursday, 2 July 2015

Cotton + Steel Mini Quilt Swap: Pt 2: Outgoing

I had so much fun with the Cotton + Steel Mini Quilt Swap.  


It was the perfect excuse to sign up for the monthly Cotton + Steel Club over at Pink Castle Fabrics . This club is the best for building a stash of C+S without having to specifically choose what you want.  Which can be hard to do when you want everything!  After a few months, I had everything I needed and more to put together a mini quilt and extras for this swap.

My assigned partner said that she likes minimalist quilts made with paper piecing, loaded with amazing machine quilting.  Huh.  I can definitely rock the paper piecing, and I like minimalist quilts too, so that is no problem.  But I was very nervous about how I should quilt the thing.  My free motion skills are beginner at best.  I have dabbled in stipples and vines with leaves before, but nothing close to "amazing machine quilting."  But, inexperience has never stopped me before.  I am a first believer in just trying.  You never know how you might surprise yourself!

Completed quilt top
I chose a meandering geese pattern I spotted on Pinterest, some Essex linen, and a variety of C+S prints to make the top.  Then I spent the next couple weeks practicing graffiti doodling with pen and paper.  

My first attempt
This way I had some ideas of what kind of motifs worked well together, what filler designs I could use in between larger designs, and a general idea of placement within the quilt.  After making a quilt sandwich with a black backing to show off the quilting, I set to work.

First, I quilted triangle spirals inside the geese.  I decided to use the spool of Glow-in-the-Dark thread I have been hoarding.  Just in case the quilting was terrible, at least I had some special effects to fall back on!  Then I started the graffiti quilting.  My practice doodles definitely helped.  I ended up adding in other things as I went, and tried fancier designs as my confidence grew.  I wouldn't say the quilting is perfect, but I think I gave it a good try and am happy with the results!

Not too bad for my first time!
I designed a quilt label to look like a postcard, complete with a C+S stamp from one of the fabric prints, and bound it with a colourful print from the August line.  I prefer hand binding to machine binding, but up until this quilt, I have never been happy with my corners.  This quilt I really feel like I got those corners perfect!  It was a proud moment for me.

Look at those mitred corners in the binding!

All done and ready to send
After completing the quilt, I made a few extras to send along.  First, using another paper piecing pattern I found on Pinterest, I made a couple mix tape blocks, using C+S selvedge as the label to turn into a zippy pouch.  I think the little Hot Cross buns make the perfect wheels!  I stuffed the pouch with a notebook and pen, and some quilty washi tape.
Front and back of the pouch
I also made a needlebook (my fave quick project!) with mostly coral fabrics, and a pop of mustard inside.  And I finally got some wool felt from Modern Textiles when I was in Fargo last April, so I used some of the good stuff for the pages.  I also made a needleminder from the bunny fabric from the Mochi line.

I always love a needlebook
I rounded out the package with some lotion and lipgloss (always essential), some Canadian contraband treats (Coffee Crisp, Smarties, and the illegal-in-the-US Kinder Egg!), and a Berenstain Bears book called God Bless Our Home, as my partner just recently moved to a new house!

Rolled up for shipping
I had a great time putting together this package, and loved getting to know my partner through her photos.  It's always nice to make a new friend, and what better way than by sending a fun present?!

If you want to see what I received in this swap, see Cotton +Steel Mini Quilt Swap: Pt 1: Incoming

Wednesday, 1 July 2015

Cotton + Steel Mini Quilt Swap: Pt 1: Incoming

The Cotton + Steel Mini Swap has come to an end, and gosh darn it, this was a fun one.  


I really love C+S, the designers just speak my language.  Everything they put out is just perfect to me.  I posted two inspiration mosaics for my partner to garner some ideas, one with some of my favourite lines, and another with some ideas of things I like.  I also mentioned that I love the selvedges, because C+S always has the cutest little sayings or drawings in them.


My fave collections
Some amazing minis - see Instagram for maker tags
My partner really ran with that!  

My gorgeous mini!
She went to the trouble of hunting down selvedges from other quilters, and turned them into this amazing mini quilt! The string blocks are just perfect, and the baby tiger accents are an adorable complement.  I can't stop gazing at the quilt, I feel like every time I notice something new, and it brings such a smile to my face.


The label and Mustang backing
This was my partner's first swap, and she sure knocked it out of the park!  She sent me a very nice handwritten note with some background about her choices for the quilt and for the extras she sent.  She said that she wanted me to squeal with joy and feel spoiled when I was opening the package.  Mission accomplished!


So many goodies!
First, the mini knocked my socks off!  She also sent the cutest little succulent salt and pepper shakers (which are perfect for me, I love both succulents and salt and pepper shakers!), an amazing kitty pincushion she made from a little ceramic creamer jug, a key fob perfect for my giant car key, and a homemade baby tiger necklace.  She sent the most delicious peanuts from her home state of Virginia (which I promptly opened and snacked on all day....), and a funny little notebook.  She sent the complete baby tiger fabric collection (wow!), a pack of Aurifil thread in my favourite neutral colours (my first Aurifil - yay!), and a pack of Wonderclips.


And the most perfect quilty tape wrapped up my package!
This was such a generous and thoughtful package.  My partner said in her note that she initially felt intimidated by my mosaics, that she wasn't sure what she could make. Well, she truly did a wonderful job making for me, and I appreciate all the hard work that went into the quilt, and all the lovely extras.  I am so glad to have a new friend from this swap, and look forward to seeing her make even more amazing things.  Thanks Jen!

If you'd like to see what I sent for this swap, see Cotton + Steel Mini Quilt Swap: Pt 2: Outgoing

Tuesday, 2 June 2015

Back by popular demand: the ripple blanket!

My sister-in-law commissioned me to make a blanket for her to give to her sister as a wedding shower gift. Her sister loved the ripple baby blanket I had made for my nephew, so she requested an adult sized version in brown neutrals.
The original baby size
This is a comfortable sized blanket for a couple to snuggle up with on the couch. It is not very heavy, yet not too light, either. And the colours are quite pleasant; gentle ripples of white, cream, and light brown.
The adult sized version
I found some adorable wooden tags with "Handmade" engraved into them, and with their dark grain, I thought they would be a perfect tag for this blanket. I stitched one onto the bottom corner over a white ripple for maximum contrast.
Handmade tag
After a quick wash (it is next to impossible to keep Annyong away from a knitted blanket), I folded the afghan up and tied it up with a ribbon and button. 
All wrapped up and ready to gift
I included a care tag I designed with washing instruction and my name on it. 
Personalized care tage
I'm excited to pass this project along for gifting. I sure hope the recipient is happy with this special homemade gift. 

Friday, 22 May 2015

Blogger's Quilt Festival Entry: Family Owlbum

I decided to enter my Family Owlbum mini quilt in the Amy's Creative Side Blogger's Quilt Festival in the mini category.
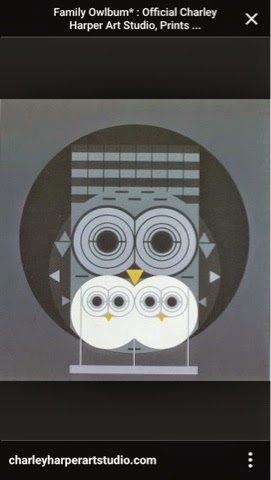
I recently participated in a Charley Harper themed swap on Instagram. My assigned partner said that she loved Family Owlbum, so I decided to recreate the piece as a mini quilt.

The original artwork by Charley Harper
Here are some photos of my work.  If you want to read more about this project, please check out this post!  Please enjoy, and vote for my quilt if you like it!
My interpretation (the front)
The quilt label (a Charley Harper nest)
The back after quilting
Close up of Family Owlbum
Close up of feathers
Closeup of machine binding
Thank you for reading! To vote, find my mini quilt in the Mini Category and click on the heart in the corner of the picture. It's that easy! 

Thursday, 14 May 2015

The Homemade Heart's Guide to English Paper Piecing

I've had some questions about how I make the La Passacaglia rosettes, so I decided to put together a quick tutorial. First of all, I want to assure you that You Can Do It!

English Paper Piecing (or EPP) is very easy, and very accessible, as you don't need any fancy or expensive tools. I will show you what I use, but even that isn't a hard and fast rule, it's just what I have become comfortable with. Adapt and use whatever makes you happy.

The pattern for the La Passacaglia quilt is found in the book Millefiori Quilts by Willyne Hammerstein. 
My well-loved book, and my templates page

My copy came from PaperPieces.com. They also sell the little paper pieces to make the quilt, but you can cut them yourself. That's what I did. I photocopied the template included in the book many times and cut them all out to fit as many as I could on a single page of card stock. Then I cut out all the pieces. Easy peasy. You need many more of the "E" triangles than are in the template, so I used the scraps of the card stock to cut extras. 

These are all the supplies I could possibly use to make rosettes. 
The supplies
1: A carrying case to hold all supplies.
2: A needlebook filled with needles. I like to use "betweens" because I find them to be thin, sharp, and decently sturdy. Also, the eye isn't very large, so it passes through the fabric without making a huge hole. 
3: A Sharpie pen to aid in fussy cutting (see the link at #12 for more info).
4: A small rotary cutter for cutting fabric. Or a large one. Or use scissors. 
5: A glue stick for glue basting. I use good old Elmers. 
6: A compact mirror to aid in fussy cutting. This tutorial helped me immensely!
7: A seam ripper. Because sometimes even the best of us make mistakes and have to rip stitches. 
8: Embroidery scissors for cutting threads. 
9: Thread for sewing. I like Gutermann hand quilting thread because it is so smooth. I chose a light grey that kinda just goes with everything, that way I don't have to constantly be changing thread colours. 
10: Wonderclips make your job so much easier when holding pieces together for sewing. They are strong and small, so they don't get in your way. 
11: Paper pieces. Like I said, you may buy them online, or just cut them yourself from card stock. The ones online are "laser cut" which makes them more accurate than handcut pieces, but I don't find that it makes a difference. I guess it just depends if your time printing and cutting tiny pieces is worth more than just buying a set. You can reuse pieces as well. Once a piece is sewn in on all sides, the paper can be removed. Don't worry about the glue, the fabric peels right off easily. 
12: Fussy cutting templates. I made my own (see this tutorial to DIY your own set). You can buy these online as well, and they are fancy acrylic ones. But I couldn't justify the price, personally. 
13: Fabric scissors. See #4 above. 
14: A needle minder and elastic band. I constantly misplace my needle, so a magnetic needleminder is very helpful to keep it readily available. The rubber band helps when you just put on hand lotion, or your hands are sweaty, and you just can't get a good grip on that needle! Use it as a grip assistant. It will help save your nails too (I find mine get all ragged when I am trying desperately to grab hold of a slippery or tightly jammed needle). 
15: Fabric, to make all your beautiful pieces! 
16: Self-healing cutting mat to use with your rotary cutter. No scratching up your tabletops, and it preserves the life of your blade, too. 

Like I said before, this isn't a hard and fast list. You may scoff at some of my items as frivolous and unnessesary, or you may be outraged that something is missing from my list. Use what you are comfortable with. 

Now that our supplies are all assembled, let's talk about making pieces. 

Your first step is to use those fussy cutting templates and a sharpie pen to locate and cut the pieces from your fabric using your rotary cutter and cutting mat, or scissors. Next, centre and glue down the paper piece onto the wrong side of your fabric. Then, run a thin strip of glue down each side and fold over your fabric edges. This is called glue basting. You can also thread baste (which I used to do), but I find glue basting is much faster. 

Now you are ready to sew. 

Place your pieces right sides together with the wonderclip on the side you will be sewing. Make sure your edges are lined up! I like to thread my needle with one strand folded in half, with the two tail ends through the eye of the needle. 
The Whip Stitch
Then I poke the needle through the right hand corner of the pieces (picture 1), draw it through, then pass the needle through the loop at the end of the thread (picture 2). This way the thread is locked without having to tie knots. Then I move over about an 1/8th of an inch, and poke my needle through again, always from the bottom to the top (picture 3). Keep doing this same stitch, bottom to top 1/8th of an inch apart along the whole edge (picture 4). This is called whip stitch. You want your stitches to be as uniform as you can make them, and try not to poke through the papers. Your are hugging the edge with your stitches. 

When you get to the last few stitches, you want to lock off your thread.

Poke your needle through as usual, but bring the needle back through the loop of the thread where it is entering the piece (picture 1). This secures the thread without tying any knots. Do this for the last 2-3 stitches. When you get to the end, bury your thread in the back of the piece by passing the needle under the seam allowance (picture 2). Make sure you don't go through the paper, or the front of the piece! Trim the thread. Open up your pieces and admire your handiwork (picture 3)! 

I like to go round by round when making my rosettes. I first cut and glue baste all my pieces, then sew them together according to the pattern. Once the round is complete, I attach it to the rest of the rosette, going piece by piece until it is all sewn in. 

This is a super fun project, and I am sure that anyone could do it if they so desired. As you can see, it isn't very difficult, and it doesn't require expensive, elaborate tools. It does take time though. Don't expect to whip through this quilt in a week! This is the kind of project where you savour each step and each stitch. 
My current WIP rosette

If you want to read more about this project, head here for the complete index!
The Homemade Heart's La Passacaglia Quilt Index


I decided to make a post that indexes any new updates on my La Passacaglia Quilt.  This is such a large and time consuming project, I anticipate it being a work in progress for quite some time! Thanks for following along, it means the world to me to hear all your positive praise and encouragement.  And if I can inspire even one person to give this project a go, it makes it all the more special to me.  Happy sewing!

2015 Project of the Year: La Passacaglia Quilt

DIY Fussy Cutting Templates Tutorial

First Rosette: 2015 Project of the Year

2015 Project of the Year: May update

The Homemade Heart's Guide to English Paper Piecing